
Abstracto
An examination of a vehicle's suspension system reveals that control arm bushings are fundamental to its integrity, influyendo en la calidad del viaje, precisión de manejo, y seguridad general. Estos componentes, típicamente hecho de caucho o poliuretano, absorb road shocks and allow the control arms to pivot smoothly. Con el tiempo, exposure to stress, environmental factors, and simple wear can lead to their degradation. This degradation manifests as audible noises, tactile vibrations, and visible irregularities in tire wear. This guide presents a systematic methodology for diagnosing the condition of these bushings. It details two primary diagnostic procedures: a comprehensive visual inspection to identify physical deterioration such as cracks and tears, and a physical manipulation test using a pry bar to assess excessive movement or play. Properly executing these checks allows for an accurate diagnosis, distinguishing between a healthy bushing and one requiring replacement, thereby preventing further suspension damage and ensuring the vehicle operates within its designed safety and performance parameters.
Conclusiones clave
- Listen for clunking or knocking sounds over bumps as a primary indicator.
- Feel for steering wheel vibrations or a wandering sensation while driving.
- Visually inspect bushings for any visible cracks, tearing, or signs of perishing.
- Learn how to check control arm bushings by using a pry bar to test for excessive play.
- Uneven or premature tire wear often points to failing suspension components.
- Always perform a wheel alignment after replacing control arms or bushings.
- Choose between pressing in new bushings or installing a complete new control arm.
Tabla de contenido
- The Foundation: Understanding the Control Arm and Its Bushings
- Deciphering the Clues: Common Symptoms of Failing Control Arm Bushings
- Method 1: A Meticulous Guide to Visual Inspection
- Method 2: The Definitive Physical Test for Bushing Integrity
- After the Diagnosis: Making an Informed Decision
- Preguntas frecuentes (FAQ)
- Conclusión
- Referencias
The Foundation: Understanding the Control Arm and Its Bushings
To truly grasp how to check control arm bushings, one must first appreciate the ecosystem in which they exist: the vehicle's suspension. Think of your car's suspension not just as a collection of springs and shock absorbers, but as a complex mechanical ballet. It is a system designed to manage an immense number of conflicting forces, striving to keep you comfortable in the cabin while simultaneously ensuring the tires remain firmly planted on the road for optimal grip and control. Within this intricate dance, the control arm acts as a primary choreographer, and its bushings are the silent, yet indispensable, partners.
What is a Control Arm?
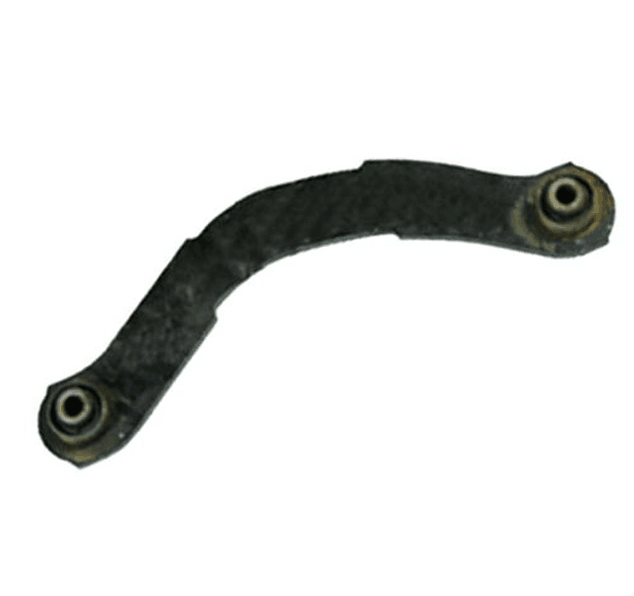
At its core, a control arm is a hinged suspension link between the chassis, or frame, of the vehicle and the steering knuckle or wheel hub (CarParts.com Research Team & McCuistian, 2025). Imagine holding a stick at one end and letting the other end move up and down; the control arm works on a similar principle. It is the crucial link that allows the wheel to travel vertically to absorb bumps, potholes, and other road imperfections. Without it, the wheel would be rigidly fixed to the car's body, transferring every single jolt directly to you and making the car nearly impossible to steer.
Most modern passenger vehicles use an independent suspension, meaning each wheel can move up and down without affecting the wheel on the opposite side of the vehicle (Timing Parts, 2025). In these systems, you will typically find at least one lower control arm, and in some designs, such as a double wishbone suspension, you will find both an upper and a lower control arm. These arms form the geometric foundation that dictates how the wheel moves, influencing critical alignment angles like camber and caster, which directly affect handling and tire wear (AutohausAZ, 2025).
The Unsung Hero: The Bushing's Purpose
If the control arm is the bone, the bushing is the cartilage. Control arm bushings are small, flexible components, usually made of rubber, synthetic rubber, or polyurethane, that are pressed into the mounting points of the control arm where it connects to the vehicle's frame. Their function is twofold and elegantly simple.
First, they act as a pivot point. The control arm must be able to move up and down freely. A rigid metal-on-metal connection would bind, wear out quickly, and create horrific noises. The bushing provides a flexible interface that allows this pivoting motion to occur smoothly and silently, thousands of times over every mile you drive.
Second, they serve as a vibration and noise isolator. Road surfaces are never perfectly smooth. High-frequency vibrations and harsh impacts travel from the tire, through the wheel, up the knuckle, and into the control arm. The bushing’s flexible material absorbs a significant amount of this energy, preventing it from being transmitted into the vehicle's frame and, ultimately, to you in the cabin. They are the primary reason a modern car feels so much more refined and quiet compared to vehicles from a century ago. They dampen the harshness of the road, contributing to what we perceive as ride comfort.
Materials and Design: From Rubber to Polyurethane
The material composition of a control arm bushing is a subject of careful engineering, representing a delicate balance between durability, actuación, and comfort. The choice of material profoundly impacts the driving experience.
| Feature | Rubber Bushings (OEM Standard) | Polyurethane Bushings (Aftermarket Performance) |
|---|---|---|
| Comfort Level | High | Moderate to Low |
| Noise & Vibration | Excellent absorption (quiet) | Less absorption (can be noisier) |
| Performance | Bien (allows for suspension flex) | Excellent (stiffer, more precise handling) |
| Durability | Bien (can degrade from oil, heat, ozono) | Excellent (resistant to chemicals, heat, and abrasion) |
| Costo | Lower | Higher |
| Ideal Use | Daily driving, comfort-oriented vehicles | Track use, performance driving, heavy-duty applications |
Traditionally, Original Equipment Manufacturers (OEMs) use rubber bushings. Natural or synthetic rubber is excellent at absorbing vibrations, providing a quiet and comfortable ride that appeals to the vast majority of drivers. Sin embargo, rubber is susceptible to degradation over time. It can become brittle from exposure to ozone and UV light, soften and swell when contaminated with oil or other automotive fluids, and tear under the constant stress of suspension movement. Some modern vehicles use hydraulic bushings, which are rubber shells filled with fluid to provide even more sophisticated damping characteristics, but these can leak when they fail.
For enthusiasts seeking sharper handling and a more connected feel to the road, aftermarket polyurethane bushings are a popular upgrade. Polyurethane is a much firmer material than rubber. It deflects less under load, which means the suspension geometry remains more consistent during aggressive cornering, accelerating, and braking. This translates to more precise steering response and improved stability. The trade-off, however, is a reduction in comfort. Because polyurethane is stiffer, it transmits more noise, vibration, and harshness (NVH) into the cabin. It is also less forgiving and can sometimes lead to squeaking if not lubricated properly during installation. The choice between rubber and polyurethane is a classic engineering compromise between comfort and performance.
Deciphering the Clues: Common Symptoms of Failing Control Arm Bushings
Your vehicle often communicates its problems through a language of sounds, feelings, and visual cues. Learning to interpret this language is the first step in diagnosing any issue. When control arm bushings begin to fail, the symptoms they produce are usually quite distinct. The once-solid, cushioned connection between the control arm and the frame becomes loose, allowing for unwanted movement. This excess play disrupts the finely tuned suspension geometry and manifests in several ways.
Auditory Clues: Listening to Your Vehicle
The most common and often first-noticed symptom of a bad control arm bushing is noise. These are not subtle sounds; they are often described as clunking, knocking, or popping noises coming from the vehicle's front or rear suspension.
Imagine the control arm as a door with a worn-out hinge. Instead of swinging smoothly and silently, the door now rattles and clunks in its frame every time you open or close it. A worn bushing allows a similar phenomenon. When you drive over a bump, the control arm moves upward, and as the suspension settles, the metal sleeve inside the bushing can knock against the control arm or the mounting bolt, creating a distinct "clunk" (Zegao Machinery, 2025). This sound is most pronounced when traveling at low speeds over uneven surfaces, such as pulling into a driveway, driving over speed bumps, or navigating a pothole-ridden street. You might also hear a creaking or squeaking sound, especially from polyurethane bushings that have lost their lubrication, which sounds like an old, unoiled hinge.
Tactile Feedback: Vibrations and Steering Issues
Beyond what you hear, you will often feel the effects of a failing bushing through the steering wheel and the seat. The suspension's job is to maintain stability, and a loose connection compromises this core function.
- Steering Wheel Vibration: As the bushing wears, it can allow the wheel to oscillate slightly, especially at certain speeds. This can translate into a vibration or shimmy felt in the steering wheel. The feeling may be constant or appear only when you hit a small bump.
- Wandering or Vague Steering: A solid bushing helps maintain the vehicle's wheel alignment. When it wears out, the control arm can shift slightly forward, backward, or side-to-side. This shift changes the alignment angles dynamically as you drive, leading to a feeling that the car is "wandering" on the road. You may find yourself making constant small corrections with the steering wheel to keep the car traveling in a straight line. The steering may feel less precise or "sloppy" (Premium Car Part, 2025).
- Pulling to One Side: If a bushing on one side of the vehicle is significantly more worn than on the other, it can cause the car to pull towards the side with the bad component. This may be especially noticeable during braking, where the force of deceleration can cause the worn control arm to shift, momentarily throwing the alignment off and causing the car to veer.
Visual Evidence: Desgaste desigual de neumáticos
Perhaps the most costly symptom if left unaddressed is abnormal tire wear. Proper wheel alignment is critical for ensuring that your tires wear evenly across their tread. The alignment angles—camber, caster, and toe—are all held in place by the suspension components, including the control arms and their bushings.
When a bushing fails, it allows for unintended movement in the control arm, which directly affects these alignment angles. Por ejemplo, a worn lower control arm bushing can allow the bottom of the tire to move in and out, causing a change in the camber angle (the vertical tilt of the tire). This will often lead to excessive wear on either the inner or outer shoulder of the tire. You might run your hand across the tire tread and feel a "feathered" or "scalloped" wear pattern. This is a clear sign that the tire is not tracking straight as it rolls down the road, and a worn bushing is a very common culprit.
| Symptom | Description | Likely Cause Related to Bushing Failure |
|---|---|---|
| Clunking/Knocking | A distinct metallic clunk or pop when going over bumps. | The metal sleeve inside the worn bushing is hitting the control arm or bolt. |
| Steering Wander | The car feels unstable and requires constant correction. | The worn bushing allows the control arm to shift, altering the alignment dynamically. |
| Braking Instability | The car pulls or dives to one side when braking. | The force of braking causes the loose control arm to shift position. |
| Desgaste desigual de neumáticos | The inside or outside edge of a tire is wearing out faster. | The failed bushing has allowed the wheel alignment (camber/toe) to fall out of spec. |
| Vibraciones | A shimmy or vibration is felt in the steering wheel or chassis. | The loose connection allows for wheel oscillation and transfers more road harshness. |
Method 1: A Meticulous Guide to Visual Inspection
The first and most straightforward diagnostic approach is a thorough visual inspection. Much like a doctor begins with a physical examination, you can learn a great deal about the health of your control arm bushings simply by looking at them closely. This method requires good lighting, a bit of patience, and a safe work environment. The goal is to identify any physical signs of degradation that indicate the bushing is no longer capable of performing its job effectively.
Preparing for the Inspection: Seguridad ante todo
Safety is paramount when working on a vehicle. You will need to lift the vehicle to gain clear access to the suspension components. Never work under a vehicle supported only by a jack.
- Park on Level Ground: Choose a solid, level surface like a concrete garage floor or driveway. Engage the parking brake firmly.
- Chock the Wheels: Place wheel chocks behind the rear tires if you are lifting the front, and in front of the front tires if you are lifting the rear. This prevents the vehicle from rolling.
- Lift the Vehicle: Using a hydraulic floor jack, lift the vehicle at the manufacturer's specified jacking point. You can find these points in your owner's manual; they are reinforced areas of the frame designed to support the vehicle's weight. Lift the vehicle high enough to comfortably work underneath and to allow the suspension to hang freely.
- Secure with Jack Stands: Once the vehicle is at the desired height, place jack stands under the specified support points on the frame or subframe. Slowly lower the jack until the vehicle's weight is resting securely on the jack stands. Give the vehicle a firm shake to ensure it is stable before you go underneath.
- Gather Your Tools: You will need a powerful flashlight or work light, a pair of safety glasses, and perhaps a small mirror to see into tight spaces.
Locating the Control Arm Bushings
With the vehicle safely supported, it is time to locate the bushings. Their position will vary depending on your vehicle's suspension design.
- Front Suspension: Look for the control arms connecting the vehicle's frame to the steering knuckle (the component your wheel and brake assembly bolts to). Most front-wheel-drive cars have a single, triangular-shaped lower control arm. You will typically find a large, round bushing at the rear pivot point of this arm and a smaller one at the front pivot point. For vehicles with a double wishbone setup, you will have both an upper and a lower arm, each with its own set of bushings to inspect.
- Rear Suspension: Many modern vehicles have a multi-link independent rear suspension, which uses several smaller arms to locate the wheel instead of one large control arm. Each of these arms will have a bushing at each end where it connects to the subframe and the wheel hub assembly. You will need to inspect all of them. Older vehicles or trucks may have a solid rear axle, which does not use control arm bushings in the same way.
What to Look For: Signs of Wear and Tear
With your flashlight, carefully examine each bushing from multiple angles. You are looking for any deviation from a solid, intact piece of rubber or polyurethane.
- Cracks and Tears: This is the most obvious sign of failure. Look for deep cracks in the rubber. These may appear as a series of small, spiderweb-like fissures (often called "dry rot") or as large, distinct tears. Pay close attention to the areas where the bushing flexes the most. A torn bushing has lost its structural integrity and cannot properly control the arm's movement.
- Deformation or Collapse: A healthy bushing should be centered and fill its housing. A worn-out bushing may appear squashed, collapsed, or off-center. You might see that the metal inner sleeve is no longer concentric with the outer metal shell, indicating the rubber has failed internally.
- Fluid Leaks: Some vehicles, particularly luxury and performance models, use fluid-filled (hydraulic) bushings for superior damping. If these fail, they will leak a dark, oily fluid. Look for a wet, grimy appearance on or below the bushing, which is a definitive sign that it needs to be replaced. Be sure to distinguish this from an oil leak from a nearby engine or transmission seal.
- Excessive Gaps or Separation: The rubber of the bushing should be firmly bonded to both its inner metal sleeve and its outer metal shell. Look for any signs of separation or gaps between the rubber and the metal components. If you can see daylight through a part of the bushing that should be solid, it is no longer functioning correctly.
Common Pitfalls in Visual Checks
While a visual inspection is powerful, it has its limits. A bushing can be internally failed without showing dramatic external cracks. The rubber may have lost its elasticity and become too soft, allowing for excessive movement that you cannot see while the vehicle is stationary. Furthermore, road grime and undercoating can sometimes mask cracks and other damage. It is always a good idea to wipe the bushing clean with a rag to get a clearer view. For these reasons, a visual inspection is often paired with a physical test to confirm a diagnosis.
Method 2: The Definitive Physical Test for Bushing Integrity
While a visual inspection can reveal obvious failures like torn or cracked rubber, some bushings can be worn out internally without showing significant external signs of distress. The rubber may have become soft and lost its ability to resist movement, even if it looks intact. To diagnose this type of failure, you must physically test the bushing for excessive play. This is the most definitive way to answer the question of how to check control arm bushings. The tool of choice for this job is a simple, long-handled pry bar.
The Right Tool for the Job: Selecting and Using a Pry Bar
A pry bar, sometimes called a pry tool or wrecking bar, provides the mechanical advantage needed to simulate the powerful forces the suspension experiences while driving. You do not need a massive one; a pry bar that is 24 a 36 pulgadas (60 a 90 cm) long is typically ideal for this task. The length gives you enough leverage to move the control arm without needing to exert Herculean effort.
Safety remains the priority. Ensure the vehicle is still securely supported on jack stands on a level surface. Always wear safety glasses, as you may dislodge dirt or rust while prying. When using the pry bar, maintain a firm grip and be mindful of where your hands and body are positioned. You want to control the force you apply and avoid having the bar slip unexpectedly.
The Test Procedure: Applying Leverage Correctly
The goal of this test is to try and move the control arm in directions it should not normally travel. A healthy bushing will allow the arm to pivot up and down, but it should strongly resist fore-aft (front to back) and side-to-side movement. A worn bushing will allow noticeable play.
- Identify a Fulcrum Point: To use a pry bar effectively, you need leverage. Find a solid, immovable point on the vehicle's frame or subframe near the bushing you want to test. The subframe, where the control arm mounts, is the perfect fulcrum. Do not pry against fragile components like brake lines, fuel lines, or the engine's oil pan.
- Position the Pry Bar: Wedge the tip of the pry bar between the control arm itself and the subframe mounting point. You want to position it so that when you apply force, you are pushing the control arm either forward and backward or side-to-side, relative to its mounting point.
- Apply Firm, Controlled Force: With the pry bar in position, apply firm and steady pressure. Watch the bushing closely as you do so. You are not trying to bend metal; you are simply trying to take up any slack in the bushing. Push the arm, release, and then pull it in the opposite direction.
- Observe the Movement: This is the critical step. As you apply force, watch the bushing and the control arm.
- A good bushing will show very little movement. The rubber will flex slightly, but the control arm itself will feel solid and firmly connected. The movement should be less than a few millimeters, and it should feel springy, returning to its original position immediately when you release the pressure.
- A bad bushing will allow for significant, sloppy movement. You will see the inner metal sleeve of the bushing shifting within the outer shell. The movement will feel loose, and you may even hear a faint clunk or click as you take up the slack. Any movement greater than approximately 1/8 of an inch (about 3-4 millimeters) is generally considered excessive and indicates a failed bushing.
Repeat this test for each bushing on both the driver's and passenger's sides of the vehicle. It is common for bushings to wear at different rates, so a thorough check is necessary.
Interpreting the Movement: What is 'Too Much' Play?
Defining "too much" movement can be subjective, but with a little practice, it becomes clear. A new bushing feels incredibly solid. The force from the pry bar will flex the rubber, but the entire assembly feels connected and taut. A worn bushing feels disconnected. There is a noticeable "gap" or "slack" that you take up before the rubber even begins to resist the force. If you can easily shift the control arm back and forth with the pry bar and see a visible gap opening and closing within the bushing, it has failed and needs replacement. Think of it as the difference between wiggling a brand-new doorknob versus one whose internal mechanism is worn out—one is tight and responsive, the other is loose and sloppy.
A Note on Front vs. Rear and Upper vs. Lower Bushings
The general principle of the pry bar test applies to all control arm bushings, but the application may differ slightly.
- Front Lower Control Arms: These often have a large rear vertical bushing and a smaller front horizontal bushing. You will need to test both. The rear bushing is often tested by prying the arm forward and backward. The front bushing is tested by prying side-to-side.
- Upper Control Arms: Accessing upper control arms can be more challenging. You may need a shorter pry bar or a different angle of attack. The principle remains the same: pry against the subframe and watch for excessive movement at the bushing pivot points.
- Rear Multi-Link Suspensions: With multiple arms in the rear, you must test the bushings at both ends of each link. The movements here can be more subtle, but the same rule applies: if you can see the metal sleeve moving independently inside the bushing housing, the bushing is worn.
By combining a careful visual inspection with a definitive physical test, you can confidently diagnose the condition of your control arm bushings and make an informed decision about repair.
After the Diagnosis: Making an Informed Decision
Once you have completed your inspection and determined that one or more control arm bushings are faulty, the next phase involves deciding on the appropriate course of action. This decision is not merely about replacing a part; it involves considerations of cost, labor, tools, and long-term vehicle health. Making the right choice here is just as important as the diagnosis itself.
When to Replace: Bushings vs. the Entire Control Arm
You are faced with two primary repair options: replacing only the failed bushings or replacing the entire control arm assembly, which comes with new bushings and, often, a new ball joint already installed.
-
Replacing Bushings Only: This approach involves using a hydraulic press or specialized tools to press the old, worn-out bushings out of the control arm and press new ones in.
- Pros: The individual bushings are typically less expensive than a complete control arm assembly. If the control arm itself and its ball joint are in good condition, this method can be more economical from a parts-cost perspective.
- Cons: This is a labor-intensive process. It requires access to a heavy-duty hydraulic shop press, which most DIY mechanics do not own. Attempting to remove and install press-fit bushings with makeshift tools (like a hammer and sockets) can damage the new bushing or the control arm itself. The time and effort involved, or the cost of paying a shop for the press work, can sometimes negate the parts savings.
-
Replacing the Entire Control Arm: This involves unbolting the old control arm assembly and installing a new one.
- Pros: This is by far the faster and simpler method for both DIYers and professional mechanics. It eliminates the need for a shop press. Crucially, a new high-quality suspension control arm assembly often includes a new ball joint. Ball joints wear out similarly to bushings, so replacing the entire unit addresses multiple potential failure points at once, effectively resetting the clock on these key suspension components.
- Cons: The initial part cost is higher than for bushings alone. Sin embargo, when you factor in the reduced labor time and the inclusion of a new ball joint, the overall value is often superior.
For most situations, especially in the DIY context, replacing the entire control arm is the recommended path. It is more efficient, requires fewer specialized tools, and provides greater peace of mind by renewing multiple wear items simultaneously.
The Importance of Post-Replacement Wheel Alignment
This step is absolutely non-negotiable. Replacing control arms or bushings directly affects the vehicle's suspension geometry. Even a tiny variation in the manufacturing of the new parts or the way they are installed can throw off the wheel alignment angles (camber, caster, and toe) (Zegao Machinery, 2025).
Driving a vehicle with improper alignment after a suspension repair will, at best, cause rapid and uneven tire wear, costing you hundreds of dollars in new tires. At worst, it can make the vehicle unstable and unsafe to drive, causing it to pull to one side or handle unpredictably.
After you have completed the replacement, you must take your vehicle to a qualified alignment shop. They will use a sophisticated alignment machine to measure the current angles and adjust them back to the manufacturer's precise specifications. Consider the cost of an alignment as the final, essential part of the repair budget.
Sourcing Quality Parts: A Note for the Discerning Owner
The quality of the replacement parts you choose will directly determine the longevity and performance of your repair. The automotive aftermarket is vast, with a wide spectrum of quality and price. While it can be tempting to opt for the cheapest available part, this is often a false economy. Lower-quality parts may use inferior materials for the bushings and ball joints, leading to premature failure and requiring you to repeat the entire job much sooner.
When sourcing parts, look for suppliers who offer components from reputable manufacturers known for meeting or exceeding OEM standards. A quality part will fit correctly, perform as intended, and provide lasting durability. When you explore our range of control arms, you are investing in components engineered for reliability, ensuring that your repair restores your vehicle's safety and ride quality for many miles to come.
Preguntas frecuentes (FAQ)
What are the main signs of a bad control arm bushing? The most common signs include a clunking or knocking sound when driving over bumps, a vibrating or loose-feeling steering wheel, the vehicle wandering or pulling to one side, and uneven or premature tire wear. A visual inspection may also reveal visible cracks, tears, or deterioration in the rubber of the bushing.
Can I drive my car with a bad control arm bushing? While it is technically possible to drive with a failing bushing, it is not recommended for safety reasons (CustomProc, 2025). A worn bushing compromises your vehicle's handling stability, steering precision, and braking performance. Continued driving can also accelerate wear on other suspension components and, most notably, cause rapid and costly tire wear. It is best to address the issue as soon as it is diagnosed.
How long do control arm bushings typically last? The lifespan of control arm bushings can vary greatly depending on the vehicle, driving conditions, and bushing material. Generally, OEM rubber bushings can last anywhere from 50,000 a 100,000 miles (70,000 a 160,000 kilómetros). Vehicles driven on rough roads or in harsh climates may see a shorter lifespan. Performance-oriented polyurethane bushings often last longer due to their more durable material.
Is it better to replace just the bushing or the entire control arm? For most DIY mechanics, replacing the entire control arm assembly is the better option. This is because pressing old bushings out and new ones in requires a hydraulic shop press and specialized knowledge. A complete control arm assembly is a straightforward bolt-on replacement and often includes a new ball joint, addressing another common wear item at the same time, which provides better long-term value.
What is the average cost to replace control arm bushings? The cost can vary widely based on the vehicle make and model, labor rates in your area, and whether you are replacing just the bushings or the whole control arm. As of 2025, parts for a single control arm can range from $50 to over $300. Labor at a professional shop can add another $100 a $400 per arm. Remember to also factor in the mandatory cost of a wheel alignment after the repair, which typically costs between $80 y $150.
Conclusión
Understanding how to check control arm bushings is a skill that empowers any vehicle owner, moving them from a position of passive concern to one of active diagnosis. The process, when broken down into its constituent parts—the preparatory safety measures, the meticulous visual inspection, and the definitive physical test—is not an arcane art reserved for seasoned mechanics, but a logical procedure accessible to anyone with a willingness to learn. By interpreting the auditory and tactile language of your vehicle and confirming your suspicions with a careful examination, you can pinpoint the source of suspension maladies with confidence. This diagnostic capability not only saves you from the potential expense of replacing the wrong parts but also deepens your connection to and understanding of the intricate mechanical systems you rely on daily. Addressing failing bushings promptly restores the vehicle's intended comfort, preserves its handling integrity, y, most importantly, reaffirms its safety on the road.
Referencias
AutohausAZ. (2025). Steering systems and suspension systems: How to maintain & repair them. AutohausAZ. https://www.autohausaz.com/tech-tips/steering-and-suspension-systems
CarParts.com Research Team, & McCuistian, R. (2025). What do control arms do? CarParts.com.
CustomProc. (2025). The ultimate guide to car suspension parts. CustomProc.
Juye Hardware. (2024). A comprehensive guide to automotive suspension systems: Functions, tipos, and applications. Juye Auto Parts.
Premium Car Part. (2025). Complete guide to car suspension components and their functions. PremiumCarPart.com.
Timing Parts. (2025). 10 types of automobile suspension system classification. Timing-Parts.com.
Zegao Machinery. (2025). A comprehensive guide to vehicle control arms. ZG Car Parts. https://www.zgcarparts.com/media/a-comprehensive-guide-to-vehicle-control-arms.html