


Tóm tắt
The tie rod end serves as a pivotal connection in a vehicle's steering system, linking the steering rack or gear to the steering knuckle at the wheel. Its integrity is paramount for precise vehicle control, handling stability, và tuổi thọ của lốp. This document provides a comprehensive examination of the procedures and principles involved in securing this component. The process of how to tighten tie rod ends involves more than the simple mechanical act of turning a nut; it requires an understanding of torque specifications, the function of locking mechanisms like castle nuts and cotter pins, and the potential impact on wheel alignment. Improper tightening, whether too loose or too tight, can introduce significant safety hazards, including steering wander, premature component wear, and in extreme cases, a complete loss of steering control. This analysis addresses the common challenges encountered during the procedure, such as a spinning ball joint stud, and outlines the five most critical mistakes to avoid. By adhering to manufacturer-specified torque values and employing correct techniques, technicians and enthusiasts can ensure a safe and reliable steering system, preserving the vehicle's intended dynamic performance.
Bài học chính
- Always use a calibrated torque wrench for final tightening.
- Never reuse an old cotter pin; always install a new one.
- Learning how to tighten tie rod ends properly prevents steering issues.
- Apply downward pressure to stop a ball joint stud from spinning.
- Confirm torque specifications from the vehicle's service manual.
- A loose tie rod end can cause catastrophic steering failure.
- After replacement, a professional wheel alignment is necessary.
Mục lục
- The Foundational Role of the Tie Rod End in Vehicle Steering
- Preliminary Checks and Preparations: Setting the Stage for Success
- The Core Procedure: A Methodical Approach to How to Tighten Tie Rod Ends
- Critical Mistake #1: Ignoring Manufacturer Torque Specifications
- Critical Mistake #2: Neglecting the Castle Nut and Cotter Pin
- Critical Mistake #3: Failing to Address a Spinning Ball Joint Stud
- Critical Mistake #4: Disregarding the Impact on Wheel Alignment
- Critical Mistake #5: Using Improper Tools for the Job
- Post-Tightening Verification and Long-Term Considerations
- Câu hỏi thường gặp (Câu hỏi thường gặp)
- Phần kết luận
- Tài liệu tham khảo
The Foundational Role of the Tie Rod End in Vehicle Steering
To truly grasp the significance of a small component like a tie rod end, one must first step back and contemplate the beautiful, intricate dance of mechanics that allows a driver to guide a multi-ton vehicle with the gentle turn of a wheel. The steering system is not a single entity but a network of cooperative parts, each with a specific duty. Your input at the steering wheel initiates a chain reaction: the steering column rotates, turning a pinion gear within the steering rack. This gear's teeth mesh with a long, toothed bar—the rack—which slides left or right. The tie rods, acting as long arms, connect the ends of this rack to the wheels. And at the very end of this chain, forming the final, crucial joint, is the tie rod end.
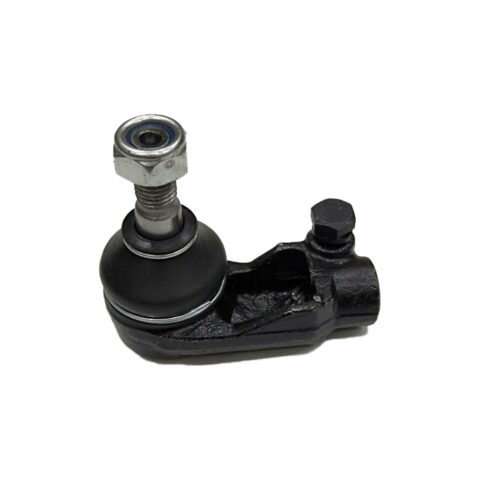
What is a Tie Rod End, Precisely?
Imagine your arm. Your shoulder allows for broad movement, your elbow provides a hinge, and your wrist offers fine, articulating control. In this analogy, the tie rod end is the wrist of the steering system. It is a small, articulating ball-and-socket joint, similar in principle to a human hip joint. One end features a threaded stud that passes through an opening in the steering knuckle (the part that holds the wheel hub). The other end is a threaded shaft that screws into the main tie rod, which allows for length adjustment during a wheel alignment.
This ball joint design is fundamental. It must be able to pivot and rotate freely in multiple directions as the wheel moves up and down with the suspension, while simultaneously and without compromise, it must transmit the precise linear motion from the steering rack to turn the wheel left or right. This dual demand for flexibility and rigidity is what makes its design and its secure installation so profound. When you consider the forces at play—the weight of the vehicle, the friction from the tires, the shock from potholes—the ability of this small joint to perform its duty millions of times over is a testament to modern engineering. The proper method of how to tighten tie rod ends is central to ensuring this performance.
Its Place in the Greater Suspension Ecosystem
The tie rod end does not operate in a vacuum. It is a citizen in the bustling metropolis of the front suspension. Its closest neighbors are the control arms, which are the primary links connecting the vehicle's frame to the wheel assembly gdstauto.com. As described in detailed automotive guides, control arms, often appearing as A-shaped or simple links, manage the wheel's vertical motion, allowing it to travel over bumps while keeping it positioned correctly (HDC MFG, 2026). Most passenger cars utilize a lower control arm, while some designs, like the double-wishbone suspension, use both an upper and a lower control arm to create a more stable and precisely controlled geometry hdcmfg.com.
Đầu thanh giằng, control arm ball joint, and the top of the strut or upper control arm form a geometric plane that defines the wheel's position. Any looseness or "play" in any of these components reverberates through the entire system. A worn control arm bushing can cause a "clunking" noise or allow the wheel to shift slightly during braking, while a loose tie rod end can manifest as a vague or wandering feeling in the steering wheel. The entire assembly, including sway bar links, shock absorbers, and ball joints, works in concert to provide a safe and comfortable ride gdstauto.com. Vì thế, when we discuss how to tighten tie rod ends, we are implicitly discussing how to restore a single, vital point of integrity within this complex web of interconnected parts.
The Language of Steering: Understanding "ngón chân"
The primary geometric angle controlled by the tie rod is called "toe." To visualize this, look down at your own feet. If you point them slightly inward, that's "toe-in." If you point them slightly outward, that's "toe-out." For a vehicle's front wheels, toe refers to the direction they are pointed relative to a straight-ahead line.
- Toe-in: The front edges of the tires are closer together than the rear edges. This configuration promotes straight-line stability, as the tires are constantly trying to push toward the center.
- Toe-out: The front edges of the tires are farther apart than the rear edges. This makes the vehicle more eager to turn, enhancing steering response.
Vehicle manufacturers specify a precise toe setting, often a very small amount of toe-in or toe-out, to balance stability with responsiveness. The length of the tie rod assembly determines this angle. When you replace a tie rod end, you invariably alter this length, which is why a wheel alignment is not just recommended but required. Tuy nhiên, the process of how to tighten tie rod ends, when performed on an existing and properly adjusted part, should not alter the toe setting. The goal is simply to secure the connection, not to change the geometry. Understanding this distinction is the first step toward becoming a responsible and knowledgeable mechanic.
Preliminary Checks and Preparations: Setting the Stage for Success
Before a single tool is laid on the vehicle, a period of thoughtful preparation is required. The act of working on a car, particularly on its steering and suspension systems, carries inherent risks. Gravity is an unforgiving force, and the components you are working with are foundational to the vehicle's safe operation. Approaching the task with a methodical and safety-conscious mindset is not just professional; it is a moral imperative. This preparatory phase is as vital to the process of how to tighten tie rod ends as the tightening itself.
The Sanctity of a Safe Workspace
Đầu tiên, consider the environment. A flat, mức độ, solid surface—such as a concrete garage floor or a paved driveway—is non-negotiable. Attempting this work on soft ground, sỏi, or an incline invites disaster. The jack could shift, or the jack stands could sink, leading to the catastrophic collapse of the vehicle. Ensure you have adequate lighting to see not just the main components but also the small details, like the hole for the cotter pin and the condition of the threads.
The safety protocol is simple but absolute:
- Chock the Wheels: Before lifting the vehicle, place wheel chocks behind the wheels on the end of the car that will remain on the ground. If you are lifting the front, chock the rear wheels.
- Lift with a Proper Jack: Use a hydraulic floor jack rated for the weight of your vehicle. Position it on the manufacturer's specified lift point on the vehicle's frame or subframe. Never use the emergency scissor jack that comes with the car for anything other than changing a flat tire.
- Secure with Jack Stands: This is the most critical safety step. Once the vehicle is lifted to the desired height, place robust jack stands under the designated support points on the frame. Slowly lower the jack until the vehicle's weight is fully resting on the stands. Give the car a firm shove to ensure it is stable and unmovable. Không bao giờ, trong bất kỳ hoàn cảnh nào, place any part of your body under a vehicle supported only by a jack. A jack is a lifting device; a jack stand is a support device. This distinction can be the difference between life and death.
Assembling Your Toolkit
Having the correct tools transforms the job from a frustrating struggle into an efficient and precise operation. Using the wrong tool can damage the component, the tool itself, or you. The following table outlines the essential and recommended tools for this task.
| Danh mục công cụ | Specific Tool | Purpose and Justification |
|---|---|---|
| Nâng & Sự an toàn | Hydraulic Floor Jack | To safely and efficiently lift the vehicle. |
| Jack đứng (Pair) | To securely support the vehicle's weight for safe under-car work. | |
| Cục chặn bánh xe | To prevent the vehicle from rolling while being lifted. | |
| Tightening & Fastening | Cờ lê mô-men xoắn (Click-type or Beam) | To apply the exact, manufacturer-specified rotational force to the nut. This is the most important tool for the job. |
| Bộ ổ cắm (6-point recommended) | To fit the castle nut. A 6-point socket provides better grip and is less likely to round the nut than a 12-point. | |
| Breaker Bar or Ratchet | For initial loosening and snugging of the nut before final torquing. | |
| Combination Wrench Set | May be needed to hold the base of the stud if it spins, or for accessing tight spaces. | |
| Inspection & Finishing | Bàn chải dây | To clean dirt, rỉ sét, and debris from the threads of the stud and nut. |
| Pliers (Needle-nose or Lineman's) | To remove the old cotter pin and install the new one. | |
| New Cotter Pin | A new pin is mandatory. Reusing an old one is a significant safety risk as they are designed for single use. | |
| Troubleshooting | Pry Bar or Floor Jack | To apply upward or downward pressure on the tie rod end to prevent the stud from spinning. |
Gathering these items before you begin ensures a smooth workflow. There is nothing more disruptive than discovering you are missing a crucial tool mid-procedure, forcing you to stop and potentially leave the vehicle in an unsafe state.
A Gentle Inspection
With the vehicle safely supported and the wheel removed, you have a clear view of the tie rod end. This is a moment for observation. Look closely at the component.
- Check the Boot: Is the rubber or silicone dust boot torn, cracked, or leaking grease? The boot protects the internal ball and socket from contamination by dirt and water. A compromised boot is a death sentence for the joint, even if it doesn't feel loose yet.
- Check for Play: Grasp the tie rod end firmly with your hand. Try to move it up and down, and side to side. There should be no perceptible "clunking" or free play. The movement should be smooth and firm as it pivots. An assistant can also rock the steering wheel back and forth slightly while you watch and feel for any looseness in the joint.
- Inspect the Threads: Look at the threaded stud and the castle nut. Are the threads clean and well-defined, or are they rusty, damaged, or stripped? Clean them with a wire brush to get a better look.
This inspection informs your next move. If you are simply re-torquing a nut that you suspect is loose, and the joint itself is in good condition, you can proceed. Tuy nhiên, if the boot is torn or there is any play in the joint, the entire tie rod end must be replaced. Tightening the nut on a worn-out joint is a futile and dangerous exercise. The problem lies within the worn socket, not the nut's tightness. The process of how to tighten tie rod ends is only valid for a mechanically sound component. If you find a worn component, you might consider sourcing a high-quality replacement tie rod end to ensure long-term safety and performance.
The Core Procedure: A Methodical Approach to How to Tighten Tie Rod Ends
We now arrive at the heart of the matter: the physical act of tightening the tie rod end's fastening nut. This procedure, while seemingly simple, is a sequence of steps where precision and attention to detail are paramount. Each action has a reason, rooted in mechanical principles and safety considerations. Let us walk through this process with the patience and care of a craftsman, ensuring that every step is executed correctly. The goal is not merely to make the nut "tight" but to achieve a specific, engineered clamping force that will endure for tens of thousands of miles.
Bước chân 1: Preparation of the Mating Surfaces
Before any tightening can occur, the stage must be set. The threads on the ball joint stud and the inside of the castle nut must be impeccably clean.
- Remove the Cotter Pin: Using your pliers, straighten the bent legs of the old cotter pin. Once they are straight, pull the pin out from its head. Discard this pin immediately. It has served its purpose and must not be reused.
- Loosen and Remove the Castle Nut: Using your ratchet or breaker bar and the correctly sized socket, turn the castle nut counter-clockwise to loosen it. If it is being tightened for the first time or as a re-check, you might only need to back it off a turn or two. If you are replacing the nut, remove it completely.
- Clean the Threads: With the threads exposed, take your wire brush and scrub them vigorously. Remove all traces of dirt, grease, road grime, and surface rust. The goal is to have clean, bare metal. Tại sao điều này lại quan trọng? Torque is a measurement of rotational resistance. If much of that resistance comes from friction due to dirty or rusty threads, a significant portion of the force you apply with your torque wrench is wasted overcoming that friction, and not translating into the proper clamping force on the joint. This can lead to a dangerously under-tightened connection, even if your wrench "clicks" at the correct value.
Bước chân 2: Initial Hand-Tightening
With the threads clean, you can now thread the castle nut back onto the stud.
- Thread by Hand: Always start the nut by hand. Xoay nó theo chiều kim đồng hồ, ensuring it goes on smoothly without cross-threading. It should spin on for several turns with only your fingers. If you feel any significant resistance, stop. Back it off and try again. Forcing a cross-threaded nut will destroy both the nut and the stud.
- Snug with a Ratchet: Once you can no longer turn the nut by hand, use your ratchet and socket to snug it down. The goal here is not to apply force, but simply to bring the base of the nut into full contact with the surface of the steering knuckle. You should feel a distinct change in resistance as the slack is taken up and the nut seats itself. Stop at this point. This is the starting line for the critical final tightening procedure.
Bước chân 3: The Art of the Torque Wrench
This is the climax of the procedure and the step that separates amateur work from professional results. The torque wrench is a precision instrument designed to apply a specific amount of rotational force.
- Set the Torque Wrench: Consult the vehicle's factory service manual for the correct torque specification for the tie rod end nut. This value is not a suggestion; it is an engineering directive. Set your click-type torque wrench to this exact value. If using a beam or dial wrench, make a mental note of the target.
- Apply Force Smoothly: Place the torque wrench and socket onto the castle nut. Apply force in a single, smooth, continuous motion. Do not use jerky or "bouncing" movements, as this can give a false reading. Continue pulling until the wrench clicks (for a click-type) or the needle aligns with the target value (for a beam-type). That click is the signal that you have achieved the specified torque. Stop immediately. Applying more force after the click is over-tightening.
- các "Spinning Stud" Dilemma: What if the entire stud of the ball joint spins along with the nut, preventing it from tightening? This is a common and frustrating problem. We will address the solutions to this in detail in the "Critical Mistake #3" section. For now, know that this is a solvable issue that often requires applying counter-pressure to the joint.
Bước chân 4: Aligning and Installing the Cotter Pin
The torque has been applied, but the job is not finished. The castle nut and cotter pin system is a vital secondary locking mechanism.
- Inspect Alignment: After torquing, look at the "crenellations" (the slots) on the castle nut. You need one of these slots to line up with the hole that runs through the threaded stud.
- The Tightening Rule: If a slot does not line up perfectly, you must always tighten slightly to get to the next available alignment. Không bao giờ, ever loosen the nut to align the hole. Loosening it, even a tiny amount, would negate the precise torque you just applied and leave the connection dangerously loose. The small additional amount of torque required to move to the next slot is accounted for in the engineering of the system.
- Install the New Pin: Slide your new cotter pin through the aligned slot and the hole in the stud.
- Secure the Pin: Using your pliers, bend the two legs of the cotter pin in opposite directions. A common practice is to bend one leg up and over the top of the stud and wrap the other leg down against the side of the nut. The goal is to secure it so it cannot back out, but also to ensure it doesn't snag on anything. Trim any excess length if necessary.
The presence of that new, properly secured cotter pin is your visual confirmation that the process of how to tighten tie rod ends has been completed correctly and safely. It is a badge of a job well done.
Critical Mistake #1: Ignoring Manufacturer Torque Specifications
In the realm of automotive repair, there exists a pervasive and dangerous myth: the myth of "mechanic's feel." It is the belief that an experienced hand can feel when a bolt is "tight enough." While this intuition might suffice for a license plate bracket or an interior trim piece, it is a recipe for disaster when applied to critical steering and suspension components. The first and perhaps most egregious error one can make in this process is to disregard the manufacturer's torque specification.
The Physics of Clamping Force
To understand why this is a mistake, we must look beyond the simple act of turning a nut and delve into the physics of the bolted joint. A tie rod end stud and nut form what is known as a tensioned fastener system. When you apply torque to the nut, you are not just preventing it from spinning off. You are stretching the stud, ever so slightly, like a very stiff spring. This stretching, known as preload or clamping force, is what holds the tapered stud of the tie rod end firmly seated in the tapered hole of the steering knuckle.
This clamping force is the true hero of the connection. It creates immense friction between the mating surfaces, preventing any microscopic movement that could lead to wear, noise, or fatigue. The torque value provided by the manufacturer is a carefully calculated proxy. Engineers have determined the precise amount of stud stretch (preload) needed for a secure joint, and then calculated the rotational force (torque) required to achieve that stretch, accounting for factors like thread pitch and friction.
The Twin Dangers: Over-Tightening and Under-Tightening
Ignoring this specification and relying on guesswork creates two equally perilous outcomes.
Under-Tightening: This is the more intuitive danger. If insufficient torque is applied, the clamping force is too low. The tapered stud may not seat fully in the knuckle. Under the dynamic loads of driving—cornering, phanh, hitting bumps—the joint can shift and move within its mounting. This can lead to:
- MỘT "Tiếng cạch cạch" Tiếng ồn: The sound of the stud moving in the knuckle.
- Chỉ đạo đi lang thang: A feeling of vagueness or "play" in the steering wheel.
- Accelerated Wear: The movement causes fretting corrosion and can damage both the stud and the knuckle hole, a condition known as "wallowing."
- Catastrophic Failure: In the most extreme scenario, a sufficiently loose nut can work its way off completely, especially if the cotter pin fails or was omitted. This would cause the tie rod to disconnect from the wheel, resulting in a complete and sudden loss of steering control for that wheel—a situation that would almost certainly cause a crash.
Over-Tightening: This danger is more insidious. The instinct is often "tighter is better," but this is fundamentally wrong. Every fastener has an elastic limit. When you tighten a bolt, you are stretching it. As long as you stay within its elastic range, it will act like a spring and maintain clamping force. If you apply too much torque, you can stretch the stud beyond its elastic limit and into its plastic range.
- Yielding the Stud: Once the stud has been permanently stretched (yielded), it loses its spring-like properties. It can no longer maintain the designed clamping force and is permanently weakened.
- Stripped Threads: Excessive force can strip the threads on the nut or the stud, rendering the connection useless.
- Fracturing the Stud: In the worst case, the stud can be stretched to its breaking point and fracture, either during tightening or later, while driving, due to fatigue.
Relying on "feel" is a gamble you cannot win. An impact wrench is even worse, providing a violent, không kiểm soát được, and unmeasurable amount of torque that is almost certain to over-tighten the fastener. The only way to ensure the correct clamping force is to use a calibrated torque wrench.
Where to Find Torque Specifications
The correct torque value is not a secret, but it must be sought from a reliable source. Generic charts are insufficient.
| Hạng xe | Example Tie Rod End Nut Torque Range (for illustration only) | Why Specificity Matters |
|---|---|---|
| Compact Car (ví dụ., Honda Civic) | 30-45 ft-lbs (40-61 Nm) | Lighter components require less force. Over-tightening could easily damage the smaller stud. |
| Sedan cỡ trung (ví dụ., Toyota Camry) | 40-55 ft-lbs (54-75 Nm) | A moderate value reflecting the balance of component size and vehicle weight. |
| Full-Size Truck (ví dụ., Ford F-150) | 85-120 ft-lbs (115-163 Nm) | Heavier-duty components are designed to handle much higher forces to manage the vehicle's greater mass and loads. |
| Performance Vehicle | Often has specific, non-standard values | May use different materials or have unique suspension geometry requiring a very precise setting. |
Disclaimer: The values in this table are purely illustrative examples and must not be used for your vehicle.
The definitive sources are:
- Factory Service Manual (FSM): This is the gold standard, published by the vehicle manufacturer for its technicians.
- Reputable Online Repair Databases: Services like AllData, Mitchell 1, or even some high-quality enthusiast forums can provide this information. Always cross-reference if possible.
- Component Manufacturer Instructions: If you are installing a new, aftermarket tie rod end, it may come with its own torque specification that could supersede the factory one.
The effort spent finding the correct number is a small price to pay for the assurance that the job was done right. The process of how to tighten tie rod ends is fundamentally a process of respecting the engineering that went into the vehicle's design.
Critical Mistake #2: Neglecting the Castle Nut and Cotter Pin
A profound understanding of engineering often reveals itself in the appreciation of redundancy and fail-safes. The castle nut and cotter pin system is a classic, elegant example of such a design. To neglect or misunderstand its function is to discard a century of engineering wisdom and introduce an unnecessary layer of risk. This second critical mistake stems from a failure to see this system not as a mere fastener, but as a two-part safety mechanism.
The Philosophy of "Belt and Suspenders"
The primary force holding the tie rod end in place is the clamping force generated by the torqued nut, as we have discussed. In a perfect world, this would be sufficient. Tuy nhiên, automotive engineers operate in the real world—a world of vibrations, temperature cycles, and unforeseen stresses. The castle nut and cotter pin system is the "suspenders" to the torque's "belt."
- The Castle Nut: Its name comes from its resemblance to the battlements of a castle. These slots, or crenellations, are not decorative. They are functional windows, providing multiple opportunities to align with the hole in the stud.
- The Cotter Pin: This simple pin, when passed through the slot and the stud and then bent, acts as a physical barrier. It mechanically prevents the nut from rotating counter-clockwise—from loosening.
Even if, through some extreme and unlikely combination of vibration and thermal cycling, the clamping force were to relax and the nut were to begin to loosen, the cotter pin would stop it from backing off more than a fraction of a turn. It cannot fall off. This prevents the catastrophic disconnection of the joint. Dismissing this system as "overkill" is a dangerous assumption.
The Cardinal Sin of Reusing a Cotter Pin
Cotter pins are made of soft, malleable metal. They are designed to be bent once for installation and then discarded upon removal. Why is reusing one such a critical error?
- Work Hardening: When you bend the metal legs of the pin, the crystalline structure of the metal changes. It becomes harder and more brittle in the area of the bend. When you straighten it for removal and then try to bend it again for re-installation, you are working this already-stressed metal.
- Fatigue and Fracture: This repeated bending can create microscopic cracks. The constant vibration of the vehicle can cause these cracks to propagate, leading to the pin fracturing and falling out. A reused pin might look secure upon installation, but it could fail weeks or months later without any warning.
- Loss of Fit: The initial, clean shape of a new pin provides a snug fit. A bent and re-straightened pin is often misshapen and may not fit as securely in the hole.
Cotter pins are incredibly inexpensive. They are a consumable item, like a paper towel or a zip tie. There is absolutely no economic or mechanical justification for reusing one. The decision to reuse a cotter pin is to trade a few cents for a significant compromise in the safety integrity of the steering system. When you are learning how to tighten tie rod ends, you must also learn how to properly finish the job, and that always includes a new cotter pin.
Proper Installation Technique Revisited
Let's re-emphasize the correct procedure, as it is central to avoiding this mistake.
- Torque First: The nut must be fully torqued to the manufacturer's specification before any consideration is given to the cotter pin. The pin is not a tightening device; it is a locking device.
- Tighten to Align: If the slots do not line up with the hole after torquing, you must apply slightly more tightening force to reach the next available slot. This small increase in torque is within the system's design tolerance. Never loosen to align. Loosening, even by a few degrees, reduces the critical clamping force and defeats the purpose of using a torque wrench.
- Secure the New Pin: Insert a new, correctly sized cotter pin. Bend the legs to secure it firmly. One common and effective method is to bend the longer leg up and over the end of the stud, while the shorter leg is bent down against the side of the nut. This creates a low-profile and secure installation.
By treating the castle nut and cotter pin with the respect they deserve, you are honoring the layered safety philosophy that underpins all responsible automotive work. You are ensuring that even if the primary system is compromised, a secondary system is there to prevent a catastrophe.
Critical Mistake #3: Failing to Address a Spinning Ball Joint Stud
We arrive now at what is perhaps the most common point of frustration in the entire process of how to tighten tie rod ends. You have everything prepared, the threads are clean, and you begin to turn the nut, only to find that the entire threaded stud, along with the ball inside its socket, is spinning. The nut makes no progress. This is not a sign that the part is defective; hơn là, it is a consequence of the part's own design.
Why Does the Stud Spin?
The ball joint at the heart of the tie rod end is designed to have very low friction. This allows it to pivot smoothly as the suspension articulates. The threaded stud is an integral part of this ball. When you try to tighten the nut, the rotational force you apply can sometimes be greater than the frictional force holding the stud stationary in its tapered seat in the steering knuckle. This is especially common when:
- The tapered seat is worn or slightly greasy.
- The nut and threads have some resistance or minor corrosion.
- The joint is new and the internal friction is at its lowest.
When the torque needed to turn the nut is greater than the torque needed to spin the ball in its socket, the path of least resistance is for the entire assembly to spin. The challenge, sau đó, is to artificially increase the friction in the tapered seat just enough to allow the nut to tighten and begin creating its own clamping force.
Method 1: The Pressure Technique (The Universal Solution)
This is the most common and often the most effective method. The goal is to use external force to press the tapered stud into the tapered hole of the steering knuckle, dramatically increasing the friction between them.
- Pressure from Below: Position a pry bar or a long, sturdy piece of wood under the body of the tie rod end. Carefully lever it upwards, pressing the tie rod end firmly into the steering knuckle. You are essentially trying to manually create the clamping force that the nut will eventually provide. It can be helpful to have an assistant apply this pressure while you work the wrench.
- Pressure from Above: Alternatively, you can use a floor jack. Place the jack's saddle (with a small block of wood to prevent damage) under the bottom of the tie rod end or the bottom of the stud if it protrudes. Gently jack upwards until you see the vehicle's suspension begin to compress slightly. This applies a strong, consistent upward force on the joint. Caution: Be extremely careful with this method. Apply only enough force to stop the spinning. Excessive force could damage the joint or lift the vehicle off its jack stands.
With this upward pressure applied, the stud should remain stationary, allowing you to tighten the nut. Once the nut is snug and the taper is starting to seat, it will usually hold itself in place, and you can remove the external pressure before proceeding to the final torque.
Method 2: The Wrench-on-Stud Technique (If Applicable)
Some tie rod end studs are designed with a built-in solution to this problem.
- Hex Base: Look at the very base of the stud, right where it meets the rubber boot. Some designs feature a hexagonal section. This allows you to place a thin combination wrench on the stud to hold it stationary while you tighten the nut with a socket from above.
- Internal Hex (Allen) Key: Other designs have a hexagonal or Torx-shaped recess in the end of the stud. This allows you to insert an Allen key or Torx driver into the stud to hold it, while you use a combination wrench on the nut.
These features are a gift from the engineers. If your part has one, use it. It is the cleanest and easiest way to solve the spinning stud problem. Tuy nhiên, not all parts have these features, which is why understanding the pressure technique is so important.
What Not to Do
In a moment of frustration, it can be tempting to resort to destructive methods. Resist this temptation.
- Do Not Grip the Threads with Pliers: Never use locking pliers (like Vise-Grips) on the threads of the stud to hold it. This will damage the threads, making it impossible to properly torque the nut and potentially requiring the replacement of the entire part.
- Do Not Use an Impact Wrench: An impact wrench's violent hammering will likely just spin the stud faster and can damage the internal components of the new joint.
Encountering a spinning stud is a test of patience. It is a puzzle to be solved with finesse, not brute force. By understanding the principle—increase the friction in the taper—and applying one of the correct methods, you can overcome this common hurdle and continue with the proper procedure for how to tighten tie rod ends.
Critical Mistake #4: Disregarding the Impact on Wheel Alignment
The relationship between the tie rod end and wheel alignment is a subject of frequent confusion. A misunderstanding here can lead to a perfectly executed tightening procedure being followed by rapid tire wear and poor handling. The fourth critical mistake is failing to distinguish between tightening an existing component and installing a new one, and neglecting the profound impact that a replacement has on the vehicle's "ngón chân" setting.
The Nuance of Tightening vs. Replacing
Let us be perfectly clear about the distinction:
- Re-tightening a loose nut on an existing tie rod end: If you have diagnosed a loose castle nut on a tie rod end that is already part of the vehicle's adjusted alignment, simply tightening it to the correct torque will not change the alignment. The length of the tie rod assembly has not been altered. You are merely restoring the integrity of the connection. The process of how to tighten tie rod ends in this context is a simple security check.
- Installing a new tie rod end: This is a completely different situation. When you replace a tie rod end, you must first unscrew the old one from the main tie rod. Even if you meticulously count the turns to unscrew it and screw the new one on by the same count, the manufacturing tolerances of the new part mean the effective length of the assembly will almost certainly be different. A change of even one millimeter—the thickness of a credit card—can have a significant effect on the toe angle.
Disregarding this fact is a false economy. You might save the cost of an alignment in the short term, but you will pay for it with a new set of tires much sooner than expected, and you will endure a less safe and less pleasant driving experience in the meantime.
A Deeper Look at Toe and Its Consequences
Như chúng ta đã đề cập trước đó, "ngón chân" is the angle of the wheels as viewed from above. An incorrect toe setting is the single fastest way to destroy a set of front tires.
- Excessive Toe-In: The tires are trying to move toward each other. As the car moves forward, both tires are being dragged slightly sideways across the pavement. This scrubs the outer edges of the tires, causing rapid, feathered wear. The steering may feel stable, but unresponsive.
- Excessive Toe-Out: The tires are trying to move away from each other. This causes them to be scrubbed across their inner edges. The car will feel "darty" and unstable, wanting to wander and requiring constant small corrections on the highway.
Think of it like dragging a rolling suitcase with the wheels turned slightly sideways. It will still move forward, but the wheels will wear down quickly and it will be difficult to pull in a straight line. The same principle applies to your car's tires, which are far more expensive to replace.
The Mandate for Professional Alignment
After replacing any component that affects steering geometry—tie rod ends, khớp bóng, control arms , or struts—a full, four-wheel alignment by a qualified shop is not optional; đây là trận chung kết, mandatory step of the repair.
An alignment machine uses sophisticated lasers and sensors to measure the toe, khum lại, and caster angles of all four wheels down to fractions of a degree. A technician then makes precise adjustments to bring these angles back into the manufacturer's specified range. This ensures:
- Maximum Tire Life: The tires roll straight and true, minimizing wear.
- Optimal Handling and Stability: The vehicle tracks straight, corners predictably, and feels stable at speed.
- Sự an toàn: A properly aligned car is a safer car, with more predictable emergency handling characteristics.
- Fuel Efficiency: Less rolling resistance from misaligned tires can lead to marginal improvements in fuel economy.
When budgeting for a tie rod end replacement, you must include the cost of the alignment. They are two parts of the same job. Presenting a customer or yourself with a car that has new parts but a bad alignment is an incomplete and unprofessional repair. A high-quality alignment after installing a premium steering and suspension component is the best way to guarantee vehicle safety and driver satisfaction. The knowledge of how to tighten tie rod ends must be paired with the wisdom to know when the job requires a trip to the alignment rack.
Critical Mistake #5: Using Improper Tools for the Job
The fifth and final critical mistake we will examine is a return to first principles: the choice of tools. While our first mistake focused on the singular importance of the torque wrench, this one addresses the broader ecosystem of tools used for the job. The selection of a tool is a statement about one's approach to the work. Choosing a crude, imprecise tool for a delicate and critical task is a sign of either ignorance or negligence. Both are unacceptable when dealing with vehicle safety.
The Seduction of Speed: The Impact Wrench
The pneumatic or electric impact wrench is a powerful and time-saving tool in a professional shop. It can remove stubborn, rusted bolts in seconds. Tuy nhiên, its use for tightening critical suspension fasteners is a cardinal sin.
- Uncontrolled Force: An impact wrench delivers its force in a series of rapid, violent rotational blows. It is impossible to accurately control the final torque applied. Even "torque-stick" attachments are notoriously inaccurate. The force delivered can vary wildly based on air pressure, battery charge, and duration of use.
- Risk of Over-Tightening: The most likely outcome of using an impact wrench on a tie rod end nut is severe over-tightening. As we discussed, this can stretch the stud beyond its elastic limit, strip threads, or even cause the stud to fracture.
- Damage to the Joint: The violent hammering action can also send shockwaves through the new tie rod end, potentially damaging the internal bearing surfaces or the ball and socket before the vehicle has even been driven.
An impact wrench can be used to remove the old nut (with caution), but it has absolutely no place in the installation of the new one. The final tightening must be done with a hand-operated torque wrench.
The Compromise of Convenience: Adjustable and Open-Ended Wrenches
The adjustable wrench (often called a Crescent wrench) and the common open-ended wrench are found in every toolbox. They are versatile, but they are not the right tools for this task.
- Poor Fit and Rounding: An adjustable wrench, by its nature, has a small amount of play in its jaws. An open-ended wrench only contacts the nut on two flats. Both are far more likely to slip and "round off" the corners of the castle nut than a properly fitting box-end wrench or a 6-point socket. A rounded nut can be impossible to properly torque and may require destructive removal.
- Inaccurate Torque Application: While you can theoretically use a torque wrench with a crow's foot adapter on an open-ended wrench, the geometry changes the effective leverage and requires a complex calculation to get the correct torque value. It is far simpler and more accurate to use a socket.
A 6-point socket is the ideal choice. It makes contact with the nut on all six flats, distributing the force evenly and providing the maximum possible grip. It is the least likely tool to slip or damage the fastener. Using the correct socket is a simple choice that prevents a host of potential problems.
The Fallacy of "Good Enough"
The mindset that leads to using improper tools is the "good enough" fallacy. It is the voice that says, "I don't have a torque wrench, but I'll just get it really tight with my breaker bar," hoặc "This adjustable wrench is a little loose, but it's probably good enough."
When working on a system upon which a driver's life may depend, "good enough" is never good enough. The correct tools are not a luxury; they are a fundamental requirement for performing the job safely and correctly. The investment in a quality torque wrench and a good set of 6-point sockets is a one-time cost that pays dividends in safety, accuracy, and peace of mind for every job you perform. The process of how to tighten tie rod ends is not just a mechanical sequence; it is a discipline. And that discipline begins with selecting and using the proper tools for the task at hand.
Post-Tightening Verification and Long-Term Considerations
The job is not truly finished when the last tool is put away. A professional and conscientious approach demands a phase of verification and an understanding of the component's future. You have meticulously followed the procedure for how to tighten tie rod ends, but now you must confirm the success of your work and be aware of the signs of future wear.
The Immediate Post-Mortem: Checks and Test Drive
Before the vehicle is driven in traffic, a few final checks are in order.
- The Double Check: With the wheel still off, give everything a final visual inspection. Is the new cotter pin properly installed and secured? Are there any tools left in the work area?
- Reinstall the Wheel: Mount the wheel back onto the hub. Hand-tighten the lug nuts in a star pattern.
- Lower the Vehicle: Carefully raise the vehicle slightly with the jack to take the weight off the jack stands. Remove the stands. Sau đó, slowly lower the vehicle completely to the ground.
- Torque the Lug Nuts: With the vehicle on the ground, use your torque wrench to tighten the lug nuts to the manufacturer's specification, again using a star pattern. This is another critical torque value that should never be guessed.
- The Initial Test Drive: The first drive should be a short, low-speed trip in a safe area, like an empty parking lot or a quiet residential street. Pay close attention to the feel of the steering and listen for any unusual noises.
- Steering Feel: Does the steering wheel feel centered when driving straight? Does the car pull to one side? (Remember, if you replaced the tie rod end, it will almost certainly need an alignment).
- Noises: Listen for any clunking, grinding, or popping sounds when turning the wheel or driving over small bumps. A properly installed joint should be silent.
The First Few Hundred Miles
After a successful test drive and a professional alignment (if parts were replaced), it is wise to remain mechanically sympathetic for the first few hundred miles.
- The Re-Torque Question: Some mechanics advocate for re-torquing critical suspension fasteners after a short period of driving (ví dụ., 100 dặm) to account for any initial settling of the components. While modern components are manufactured to high tolerances, this is a cautious and generally harmless practice. If you choose to do this, you will need to jack the vehicle up again, but it can provide an extra measure of peace of mind.
- Lắng nghe xe của bạn: Be attuned to any changes in sound or feel. The development of a new noise or a change in steering behavior warrants immediate inspection.
Understanding the Lifespan and Future Inspection
A tie rod end is a wear item. It will not last forever. Its lifespan is affected by driving conditions, road quality, and the quality of the part itself. A part from a reputable manufacturer, like those found in comprehensive catalogs of automotive suspension parts, will typically last much longer than a low-quality, no-name alternative (Prototek Parts, 2025).
- Typical Lifespan: While there is no fixed replacement interval, a quality tie rod end can be expected to last between 50,000 Và 100,000 dặm (khoảng 80,000 ĐẾN 160,000 km). Tuy nhiên, a single severe pothole impact can damage a joint prematurely.
- Inspection Intervals: It is good practice to inspect the tie rod ends and other suspension components during every tire rotation (typically every 5,000 ĐẾN 7,500 dặm). This involves the same "check for play" procedure you performed during the initial preparation. A quick check takes only a minute and can catch a developing problem before it becomes severe.
By building this cycle of verification and periodic inspection into your maintenance routine, you transform a one-time repair into an ongoing commitment to vehicle safety. You move from simply knowing how to tighten tie rod ends to understanding how to manage the health of the entire steering and suspension system over the long term.
Câu hỏi thường gặp (Câu hỏi thường gặp)
1. How do I know if my tie rod end is loose? You may notice several symptoms. The most common is a vague or "wandering" feeling in the steering, where you have to make constant small corrections to keep the car driving straight. You might also hear a "clunking" hoặc "popping" sound from the front end, especially when turning at low speeds. Another key indicator is uneven tire wear, specifically on the inner or outer edges of the front tires, which suggests a problem with the toe alignment caused by a worn component.
2. Can I drive my car with a loose tie rod end? It is extremely dangerous and strongly discouraged. A loose tie rod end can lead to unpredictable steering and excessive tire wear. In the worst-case scenario, the tie rod can separate from the steering knuckle completely, resulting in a total loss of steering control for that wheel. If you suspect a loose tie rod end, you should have it inspected and repaired immediately.
3. Sự khác biệt giữa đầu thanh giằng bên trong và bên ngoài là gì? The outer tie rod end is the component we have focused on, which connects the main tie rod to the steering knuckle at the wheel. The inner tie rod end is located at the other end of the main tie rod, connecting it to the steering rack itself. It is also a ball-and-socket joint, but it is typically covered by a large, accordion-like rubber boot. Thay thế đầu thanh giằng bên trong là một công việc phức tạp hơn và thường cần một công cụ đặc biệt.
4. Why do I need a wheel alignment after replacing a tie rod end? When you replace a tie rod end, you are changing the overall length of the steering linkage. Even a tiny difference of a millimeter can significantly alter the "ngón chân" angle of your front wheels. This incorrect angle will cause rapid tire wear and can make the vehicle unstable. An alignment technician uses a precision machine to measure and adjust the toe back to the exact specification, ensuring safety, proper handling, and maximum tire life.
5. How much does it cost to have a tie rod end tightened or replaced? The cost varies widely based on vehicle make and model, labor rates in your area, and the quality of the parts. If you are just having a loose nut re-torqued, a shop might charge a small diagnostic or labor fee. For a full replacement, you can expect to pay for the part itself, one to two hours of labor, and the mandatory cost of a wheel alignment. Always opt for quality parts, as they are fundamental to your vehicle's safety.
6. Can I use a regular nut instead of a castle nut? KHÔNG. The castle nut is specifically designed to be used with a cotter pin as a locking mechanism. Using a standard nut, even with a lock washer, does not provide the same level of security against loosening under vibration. The tie rod end stud is drilled for a cotter pin, and this safety feature should always be used as intended by the manufacturer.
7. What happens if I tighten the nut too much? Over-tightening is as dangerous as under-tightening. Excessive torque can stretch the threaded stud past its elastic limit, permanently weakening it. This is called "yielding." A yielded stud can no longer maintain the proper clamping force and is susceptible to fracturing under stress. It can also strip the threads on the nut or the stud. Always use a torque wrench and adhere to the manufacturer's specification.
Phần kết luận
The task of how to tighten tie rod ends, when examined with care, reveals itself to be far more than a simple mechanical chore. It is an exercise in precision, a study in applied physics, and a profound responsibility. We have navigated the intricate landscape of the steering system, recognizing the tie rod end not as an isolated part, but as a vital citizen within a complex mechanical society that includes control arms and ball joints (Topshine Auto Parts, 2026). We have established that preparation, sự an toàn, and the use of proper tools are not preliminary courtesies but the very foundation upon which a successful and safe repair is built.
The core of our exploration has been the identification and dissection of five critical mistakes: the hubris of ignoring torque specifications, the negligence of disrespecting the cotter pin, the frustration of a spinning stud, the ignorance of alignment's role, and the folly of using improper tools. Each mistake represents a departure from sound engineering principles and an introduction of unnecessary risk. By understanding the "why" behind each correct procedure—the physics of clamping force, the philosophy of fail-safes, the geometry of alignment—we elevate the work from mere craft to a disciplined science.
Ultimately, the humble tie rod end serves as a powerful teacher. It reminds us that in the world of automotive mechanics, there are no small or insignificant parts, only critical functions. It demonstrates that the forces that hold our vehicles together are precise and quantifiable, and should be treated with the respect of measurement, not the ambiguity of guesswork. Whether you are a seasoned technician or an aspiring enthusiast, embracing this philosophy of precision and safety is the true mark of expertise.
Tài liệu tham khảo
gdstauto. (2026, Bước đều 17). Complete guide to control arms: Chức năng, các loại, problems & replacement. GDST. https://gdstauto.com/control-arm-guide/
gdstauto. (2026, Tháng hai 27). The ultimate guide to front suspension parts: Diagram, thành phần & function (2026). GDST. https://gdstauto.com/the-ultimate-guide-to-front-suspension-parts/
HDC MFG. (2026, Bước đều 25). Lower and upper control arms: What they are and why they matter. https://hdcmfg.com/resources/blog/lower-and-upper-control-arms/
JCMSTECH. (2026, Tháng Một 13). Hướng dẫn điều khiển vũ khí: What they do, các loại, symptoms & how to choose. JCM Auto Parts Co., Công ty TNHH.
LK Control Arm. (2024, Tháng tám 12). Hướng dẫn toàn diện về cánh tay điều khiển xe. https://www.lkcontrolarm.com/news/what-are-control-arms-and-what-do-they-do.html
Prototek Parts. (2025, Có thể 23). A comprehensive guide to control arms. https://prototekparts.com/zh/a-comprehensiveguideto-control-arms/
Topshine Auto Parts. (2026, Tháng Một 14). A comprehensive analysis of the control arm, a core component of automotive suspension. https://www.topshineparts.com/a-comprehensive-analysis-of-the-control-arm-a-core-component-of-automotive-suspension/