
Tóm tắt
The longevity of automotive control arms is a subject of considerable interest for vehicle owners and maintenance professionals. Những thành phần này, which are fundamental to the suspension system, dictate steering precision, ride comfort, and overall vehicle safety. While there is no universal lifespan, factory-installed control arms are generally engineered to last for a significant duration, often exceeding 100,000 miles under ideal conditions. Tuy nhiên, their functional life is profoundly influenced by a confluence of variables, including driving habits, road surface quality, environmental exposure to corrosives like road salt, and the material composition of the arm itself. Failure typically manifests not in the metallic arm, but in the integrated bushings and ball joints, which are susceptible to wear and degradation. Recognizing the symptoms of a failing control arm—such as steering vibrations, audible clunking noises, and uneven tire wear—is paramount for timely diagnosis and replacement, thereby preventing further suspension damage and ensuring occupant safety.
Bài học chính
- Inspect control arm bushings and ball joints during routine tire rotations.
- Heed steering wheel vibrations or clunking sounds as early failure warnings.
- Poor road conditions and aggressive driving significantly shorten component life.
- Understand that the question of how long do control arms last depends heavily on driving style.
- Always perform a wheel alignment after replacing any suspension control arm.
- Replace control arms in pairs for balanced handling and predictable performance.
- Worn components can lead to compromised steering control and safety risks.
Mục lục
- The Unsung Hero of Your Ride: Understanding the Suspension Control Arm
- The Core Question: How Long Do Control Arms Last?
- The 7 Critical Signs of a Failing Control Arm
- Diagnostic Procedures: From Visual Inspection to Professional Assessment
- The Replacement Process: A Comprehensive Overview
- Beyond the Control Arm: A Holistic View of Suspension Health
- Câu hỏi thường gặp (Câu hỏi thường gặp)
- Phần kết luận
- Tài liệu tham khảo
The Unsung Hero of Your Ride: Understanding the Suspension Control Arm
Within the complex and often overlooked world beneath our vehicles, a system of levers, joints, and springs works in silent concert to provide a smooth, stable, and safe journey. At the very heart of this mechanical ballet is the suspension control arm. It is a component whose function is so elemental to a vehicle's dynamics that its proper operation is something we take for granted until it begins to fail. To truly grasp the importance of its longevity and the implications of its failure, we must first develop an appreciation for its role, its structure, and its elegant, yet demanding, purpose. Think of it not as a mere piece of metal, but as a crucial limb connecting the vehicle's frame to its wheels, constantly mediating the relationship between the driver's intentions and the road's imperfections.
What is a Control Arm? A Foundational Explanation
At its most basic, a suspension control arm is a hinged link that connects the vehicle's chassis to the steering knuckle or hub—the assembly that holds the wheel. Most modern passenger cars have at least two control arms in the front suspension, typically an upper and a lower one, and often a similar setup in the rear, especially in vehicles with independent rear suspension. These arms are designed to allow the wheels to move up and down, absorbing bumps and undulations in the road surface, while simultaneously preventing fore-and-aft movement. They are the primary components responsible for locating the wheel within the wheel well, ensuring it remains in its correct position relative to the car's body through all phases of suspension travel. This dual function of allowing vertical motion while restricting other movements is the key to its design.
The Pivotal Role in Your Vehicle's Suspension System
The control arm's role is far more dynamic than simply holding a wheel in place. It serves as a critical pivot point. As the wheel encounters a bump, the control arm swings vertically, allowing the spring and shock absorber (or strut) to compress and absorb the impact. This motion is what isolates the vehicle's cabin from the harshness of the road. Without control arms, every jolt would be transferred directly into the frame, resulting in an intolerably rough ride.
Furthermore, these arms are instrumental in defining the vehicle's suspension geometry—the specific angles of the wheels relative to the car and the road. Angles like camber (the inward or outward tilt of the top of the tire), caster (the forward or backward angle of the steering axis), and toe (the direction the tires are pointed relative to each other) are all maintained by the precise length and mounting points of the suspension control arm. When these components are in good condition, the geometry is correct, and the vehicle tracks straight, steers predictably, and wears its tires evenly. When they wear out, this carefully engineered geometry is compromised, leading to a cascade of negative effects.
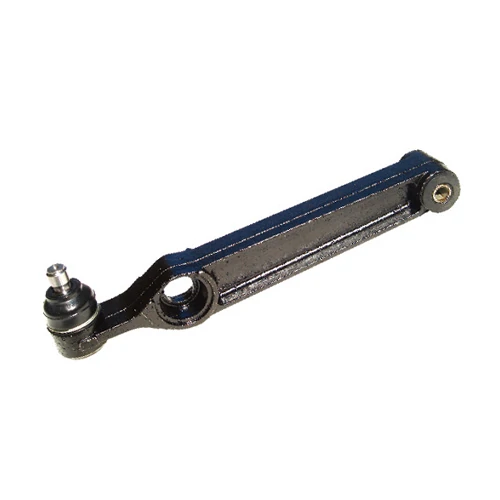
Anatomy of a Control Arm: The Arm, Bushings, and Ball Joint
To comprehend how a control arm fails, one must understand its constituent parts. It is rarely the solid metal arm itself that breaks; rather, it is the flexible connection points that wear out.
-
The Arm: This is the main structural body, typically forged or stamped from steel, cast iron, or, in many modern vehicles, lightweight aluminum alloy. Its shape is determined by the specific suspension design, often resembling the letter 'A' or 'L'. Its job is to provide rigid, unyielding strength.
-
Bushings: At the point where the control arm mounts to the vehicle's frame, you will find bushings. These are cylindrical sleeves made of rubber, polyurethane, or a similar elastomeric material, encased in a metal shell. The inner bolt passes through them, securing the arm to the chassis. Bushings are the unsung heroes of ride quality. They absorb minor vibrations and noise, and they provide a small amount of controlled flex that allows the suspension to move smoothly through its arc without binding. Theo thời gian, these rubber components are subjected to immense and constant stress, heat, and environmental contaminants, causing them to crack, harden, or tear.
-
khớp bóng: At the outer end of the control arm, where it connects to the steering knuckle, is a ball joint. As its name suggests, this is a ball-and-socket joint, very much like a human hip. It consists of a metal ball stud enclosed in a lubricated metal housing. The ball joint is a marvel of engineering, as it must allow the wheel to pivot for steering while also moving up and down with the suspension. It carries a significant portion of the vehicle's weight and endures constant rotational and articulating forces. Wear occurs as the internal components lose lubrication, become contaminated with dirt and water, and develop excessive play or looseness. A worn tie rod ball joint, a related but distinct component, primarily affects steering linkage, while a worn control arm ball joint affects the entire wheel's positioning.
The lifespan of a suspension control arm is, in reality, the lifespan of its weakest links: the bushings and the ball joint. The central question of how long do control arms last is therefore a question of how long these wear-and-tear components can endure their task.
Types of Control Arms: A-Arms, L-Arms, and Multi-Link Setups
The specific design of a control arm is dictated by the type of suspension system it serves. The most common type is the "A-arm" or "wishbone," named for its triangular shape. A double-wishbone suspension, found in many performance and luxury vehicles, uses two A-arms (an upper and a lower) to precisely control wheel movement, offering superior handling characteristics.
A MacPherson strut suspension, common in many front-wheel-drive cars for its compact and cost-effective design, typically uses only a single lower control arm. This arm is often 'L'-shaped, with two mounting points to the chassis and one ball joint connecting to the bottom of the steering knuckle. In this setup, the strut itself acts as the upper locating link.
More advanced "multi-link" suspensions, often found on the rear axles of modern vehicles, use a series of individual arms, or "links," instead of one or two large control arms. Each link controls one specific aspect of the wheel's movement. While this design offers the best possible ride and handling, it also introduces more bushings and joints that can potentially wear out. Understanding which type of system your vehicle uses is the first step in diagnosing issues and appreciating the complexity of the forces at play.
The Core Question: How Long Do Control Arms Last?
Every car owner, at some point, will likely ponder the durability of their vehicle's core components. For those who notice a new noise, a change in steering feel, or uneven tire wear, the inquiry becomes more urgent. The question, how long do control arms last?, does not yield a single, universally applicable number. It's a question whose answer is a narrative of use, environment, and material science. A control arm on a car that spends its life gliding down smooth Californian highways will have a vastly different story from one on a vehicle navigating the pothole-ridden, salt-covered streets of a Chicago winter. While manufacturers design these parts for longevity, often citing figures of 100,000 miles or more, this should be seen as an ideal rather than a guarantee.
Establishing a Lifespan Baseline: Mileage and Time
Under normal, favorable driving conditions, it is reasonable to expect the original equipment manufacturer (OEM) control arms on a vehicle to last for 8 ĐẾN 12 năm, or somewhere between 90,000 Và 150,000 miles. Some may last the entire lifetime of the vehicle without requiring replacement. This baseline, however, is highly theoretical. The failure of a suspension control arm is almost always a story of the degradation of its softer components. The rubber bushings dry out, crack, and lose their ability to dampen vibration and maintain alignment. The internal bearing surfaces of the ball joint wear down, creating looseness. Time itself is a factor, as rubber and grease degrade regardless of mileage. A ten-year-old car with only 30,000 miles may still need new control arms simply because its bushings have perished from age and exposure. Therefore, a vehicle's lifespan must be measured in both miles driven and years on the road.
The Great Influencers: Factors That Shorten Control Arm Life
The journey from a new, tight suspension to a worn, noisy one is accelerated by a number of powerful factors. Understanding these influencers is key to maximizing the life of your suspension components and anticipating when problems might arise. The debate over how long do control arms last is truly a debate about the severity of these factors.
| Factor | High-Impact Actions & Conditions | Low-Impact Actions & Conditions | Estimated Lifespan Impact |
|---|---|---|---|
| Driving Habits | Aggressive cornering; frequent hard acceleration and braking; driving at high speeds on poor roads. | Smooth, defensive driving; avoiding sudden inputs; slowing for bumps and dips. | Can reduce lifespan by up to 50% |
| Road Conditions | Frequent driving on pothole-filled roads, gravel, or unpaved surfaces; regular encounters with speed bumps at speed. | Predominantly highway driving on well-maintained asphalt or concrete. | Can reduce lifespan by 40-60% |
| Environmental Exposure | Areas with heavy road salt use in winter; high humidity or coastal regions with salt air; extreme temperature fluctuations. | Dry, arid climates with minimal use of road de-icing chemicals. | Can reduce lifespan by 30-50% |
| Vehicle Loading | Consistently carrying heavy loads or towing trailers that exceed the vehicle's recommended capacity. | Operating the vehicle within its designed weight limits. | Can reduce lifespan by 20-30% |
| Accidents/Impacts | Hitting a curb, a large pothole at speed, or any form of collision, even if minor. | No history of significant impacts to the wheels or suspension. | A single severe impact can cause immediate failure. |
A driver who commutes aggressively in a northern city with harsh winters may find their control arm bushings failing at 50,000 miles, while another driver in a southern state with smooth roads might see 200,000 miles from the same parts.
OEM vs. Aftermarket: A Durability Comparison
When a replacement is needed, a choice arises between OEM parts from the vehicle manufacturer and aftermarket parts from third-party companies. The notion that OEM is always superior is a simplification. OEM parts are guaranteed to fit and perform exactly as the originals did—which includes any original design flaws. They are built to the manufacturer's specific standards for materials and durability.
High-quality aftermarket manufacturers, however, often see opportunities to improve upon the original design. They might use a more durable polyurethane material for the bushings instead of standard rubber, or they might engineer a "problem-solver" ball joint with a better seal and a grease fitting that allows for periodic lubrication, a feature often omitted from modern OEM parts to save costs. Reputable aftermarket suppliers, such as those offering a wide range of high-quality suspension control arms, can provide components that meet or even exceed OEM specifications, often at a more competitive price point. Conversely, low-quality, budget aftermarket parts can be a false economy, using inferior materials that may fail in a fraction of the time, putting you right back where you started. The key is to choose a trusted brand known for its commitment to quality engineering.
Material Matters: Stamped Steel vs. Cast Iron vs. Aluminum
The material from which the control arm is made also plays a role in its overall performance and, to a lesser extent, its longevity.
- Stamped Steel: This is the most common and cost-effective method. Layers of sheet steel are stamped into shape and welded together. These arms are strong and relatively lightweight, but they can be susceptible to bending under a severe impact and are more prone to rust if their protective coating is compromised.
- Cast Iron: Found on many trucks, SUV, and older passenger cars, cast iron control arms are incredibly strong and rigid. Their primary drawback is weight. This "unsprung" cân nặng (weight not supported by the springs) can negatively affect ride quality and handling response. They are very resistant to bending but can crack under an extreme, sharp impact.
- Aluminum Alloy: Increasingly common on modern and luxury vehicles, cast or forged aluminum control arms offer an excellent strength-to-weight ratio. Reducing unsprung weight is a major goal for automotive engineers, as it allows the suspension to react more quickly to road imperfections, improving both ride and handling. While highly resistant to corrosion, aluminum can be more susceptible to fatigue cracks over a very long life cycle and is more likely to break than bend upon severe impact.
While the arm material itself is not usually the point of failure, it contributes to the overall dynamics of the suspension system. A heavier cast iron arm places more stress on its bushings and ball joint than a lightweight aluminum one, which can subtly influence how long those wear components last.
The 7 Critical Signs of a Failing Control Arm
A failing suspension control arm does not typically fail suddenly and catastrophically without warning. Thay vì, it offers a series of escalating clues, whispers of distress that grow into audible shouts. Learning to interpret these signs is the most valuable skill a vehicle owner can possess for maintaining their car's safety and performance. These symptoms are the vehicle's way of telling you that the precise geometry of its suspension has been compromised. Ignoring them is not only detrimental to the car's health but also to the safety of its occupants. Let's explore the seven most prominent indicators that your control arms require attention.
Sign 1: Steering Wheel Vibrations and Shimmying
This is often one of the first and most unsettling symptoms. You are driving at a steady speed, perhaps on the highway, and you begin to feel a distinct vibration or a rapid back-and-forth shimmy in the steering wheel. This sensation is a direct result of excessive play in a worn ball joint or a degraded control arm bushing. The wheel is no longer held rigidly in place; it is allowed to oscillate slightly but rapidly. This oscillation is transferred up the steering column directly to your hands.
Think of it like a shopping cart with a wobbly wheel. That wobble creates a vibration you can feel through the handle. In your car, a worn ball joint at the end of the suspension control arm allows for a similar, albeit much smaller and faster, wobble. This vibration may come and go, often appearing only within a specific speed range (e.g., 50-65 mph) and then smoothing out at higher speeds. This happens because the frequency of the wheel's oscillation hits a resonant frequency with the suspension system at those particular speeds. If you feel this, it's a clear indication that a key connection point is loose.
Sign 2: Clunking, Popping, or Banging Noises
Audible feedback is another primary way your car communicates distress. You may hear a distinct "clunk" or "pop" when you drive over a bump, a speed bump, or even a small dip in the road. Sometimes the noise occurs during braking or acceleration, as the vehicle's weight shifts forward or backward. This sound is the physical manifestation of excessive movement.
When a control arm bushing is worn out, what was once a snug, rubber-cushioned pivot point becomes a loose, metal-on-metal connection. The "clunk" you hear is the sound of the control arm's inner bolt or sleeve slamming against the subframe mount as the suspension compresses or rebounds. Similarly, a worn-out ball joint can create a popping sound as the loose stud shifts and knocks within its socket. These noises are most pronounced at low speeds when navigating uneven terrain, such as pulling into a driveway or driving through a parking lot. A related component, the stabilizer link, can also cause clunking noises over bumps when its own small ball joints or bushings are worn, so a careful inspection is needed to pinpoint the source.
Sign 3: Unstable or Wandering Steering
Perhaps the most dangerous symptom is a degradation of steering stability. You might find that your car "wanders" or "tramlines," meaning it tends to follow ruts and grooves in the road, requiring constant small corrections at the steering wheel to keep it tracking straight. The car may feel vague, imprecise, or "loose." This sensation arises because the worn bushings and ball joints are allowing the wheels to change their alignment angles dynamically as you drive.
A healthy suspension maintains a fixed alignment. A worn suspension allows the wheel to toe-in or toe-out, or its camber angle to change, every time it hits a bump or the car's weight shifts. This constant, uncontrolled change in alignment means the car is no longer pointed exactly where you are steering it. This requires you, the driver, to be hyper-vigilant, making continuous micro-adjustments. In a crosswind or on an uneven road surface, this can be both exhausting and perilous. The question of how long do control arms last becomes a safety-critical issue when steering integrity is compromised.
Sign 4: Uneven and Premature Tire Wear
Your tires are the ultimate witnesses to the health of your suspension. They can tell a detailed story of misalignment long before other symptoms become obvious. When a suspension control arm is worn, it can no longer hold the wheel at the correct angle relative to the road. The most common result is camber-related tire wear.
If a worn lower ball joint or inner bushings cause the bottom of the wheel to move outward, the top of the wheel will tilt inward, creating negative camber. This will cause accelerated wear on the inside edge of the tire. Conversely, if the components allow the bottom of the wheel to move inward, the resulting positive camber will wear the outside edge. You can often see this by looking at your front tires. If the inner or outer shoulder of the tire is significantly more worn than the rest of the tread, it's a tell-tale sign of a persistent alignment problem, and worn control arm components are a primary suspect. This is not just a matter of replacing tires more often; it's a physical record of a system operating outside its design parameters.
Sign 5: Visible Damage to the Control Arm or Bushings
Sometimes, the evidence is available to the naked eye. A simple visual inspection can reveal a great deal about the condition of your control arms. Using a flashlight, look at the points where the control arm connects to the frame. You are looking for the rubber bushings. In a healthy bushing, the rubber will be intact and fill the space snugly. In a failing bushing, you may see large cracks, tearing, or chunks of rubber that are missing entirely. The bushing might look oblong or distorted, and you may see evidence of the inner metal sleeve having shifted off-center.
For the ball joint, inspect its protective rubber boot. If this boot is torn or missing, it means the grease inside has likely escaped, and dirt and water have entered, accelerating wear dramatically. You may also see the control arm itself. While less common, look for any signs of bending, cracking, or severe corrosion that might compromise its structural integrity, especially if you know the vehicle has been in an accident or has hit a significant road hazard.
Sign 6: Misaligned Wheels and Steering Pull
This symptom is closely related to unstable steering but is more constant. If your vehicle consistently pulls to one side when you are driving on a flat, straight road and you let go of the steering wheel momentarily, it's a classic sign of a wheel alignment issue. While many things can cause a pull, a worn control arm is a very common culprit.
If the bushings on one side of the vehicle are more worn than on the other, it can cause a change in the caster or camber on that side, leading to a persistent pull. The car is essentially trying to steer itself in one direction. You might find yourself holding the steering wheel at a slight angle just to keep the car going straight. Getting a wheel alignment might temporarily fix the issue, but if the underlying cause is a worn control arm, the alignment will not "hold." The car will soon start pulling again as the loose components shift back out of spec.
Sign 7: Deterioration in Ride Comfort and Handling
The final sign is a more holistic, subjective feeling that the car just doesn't drive like it used to. The ride may feel harsher, with more impacts being transmitted into the cabin. The car might feel less "planted" or secure when cornering, exhibiting more body roll or a feeling of instability. This is the cumulative effect of all the other issues. The worn bushings are no longer isolating vibrations, the loose ball joints are compromising grip, and the inconsistent alignment is making the car's responses less predictable.
This degradation can be gradual, so much so that a driver may not notice it from one day to the next. They simply adapt their driving style to compensate. Often, the true extent of the deterioration only becomes apparent after the worn parts are replaced. The owner then experiences a "like-new" feel and realizes just how poor the ride and handling had become. The question of how long do control arms last is not just about mechanical failure; it's also about the slow erosion of the vehicle's intended character and performance.
Diagnostic Procedures: From Visual Inspection to Professional Assessment
Diagnosing a faulty suspension control arm is a process of elimination and confirmation. It involves a combination of sensory feedback (listening for noises, feeling vibrations), visual evidence, and physical testing. While a professional mechanic with a vehicle lift and specialized tools can perform the most definitive diagnosis, a vigilant car owner can perform several preliminary checks to determine if a trip to the shop is warranted. This process empowers you to have a more informed conversation with your technician and to better understand the work being recommended for your vehicle.
The At-Home Visual Check: What to Look For
The first step in any diagnosis is a thorough visual inspection. Even without jacking up the car, you can learn a lot.
- Park on Level Ground: Ensure the car is on a flat, stable surface. For safety, engage the parking brake.
- Turn the Wheels: Turn the steering wheel all the way to one side. This will expose the front suspension components of the wheel on the outside of the turn, making them easier to see.
- Use a Flashlight: Get a bright flashlight and look behind the wheel. Identify the lower suspension control arm (and the upper one, if your vehicle has one). Trace it from the wheel hub back to where it mounts to the car's frame.
- Inspect the Bushings: Focus on the rubber bushings at the frame mounting points. Look for the signs of wear mentioned previously: deep cracks, tearing, missing chunks of rubber, or fluid leaking from fluid-filled (hydro) bushings. The rubber should look solid and uniform. Any sign of severe degradation is a red flag.
- Inspect the Ball Joint Boot: Examine the rubber boot covering the ball joint where the control arm connects to the steering knuckle. A torn or split boot is a clear sign of impending failure, as it allows contaminants to destroy the joint from the inside.
- Check for Obvious Damage: Look at the arm itself for any signs of bending, heavy corrosion, or cracks. This is especially important if you have recently hit a curb or a large pothole.
Repeat this process for the other side. Comparing the appearance of the components from one side to the other can sometimes highlight an issue.
The "Wiggle Test": Checking for Play in Bushings and Ball Joints
This next step requires safely jacking up the front of the vehicle and securing it with jack stands. Never work under a vehicle supported only by a jack.
- Secure the Vehicle: Chock the rear wheels, jack up the front corner you are inspecting at the manufacturer's recommended lift point, and place a jack stand securely under the frame. Lower the vehicle onto the jack stand.
- Test for Ball Joint Play (Vertical): With the suspension hanging freely, grab the tire at the top (12 o'clock position) and bottom (6 o'clock position). Try to wiggle the wheel by pushing in at the top and pulling out at the bottom, then reversing the motion. There should be almost no movement or play. If you feel a distinct "clunk" or see noticeable movement, this is a strong indicator of a worn ball joint (either upper or lower).
- Test for Tie Rod/Steering Play (Horizontal): Now, grab the tire at the sides (9 o'clock and 3 o'clock positions). Try to wiggle the wheel from side to side. A small amount of movement is normal as you are moving the steering linkage, but if there is excessive, clunky play, this points more toward a worn tie rod ball joint, which is a different but related component. Differentiating between the two is key.
- Test for Bushing Play (Pry Bar Method): This requires a bit more care. With the wheel still off the ground, take a long pry bar and position it between the suspension control arm and the subframe, near a bushing. Gently pry against the arm to see if you can create movement. A good bushing will allow very little movement, and it will feel firm and rubbery. A worn bushing will allow for significant, often clunky movement, as the metal inner sleeve moves around inside the worn-out rubber.
This diagnostic table can help you interpret what you find:
| Test Performed | Observation | Likely Culprit |
|---|---|---|
| Visual Inspection | Cracks, tears, or missing rubber in bushings. | Worn Control Arm Bushings |
| Visual Inspection | Torn rubber boot on the ball joint. | Failing Control Arm Ball Joint |
| Wiggle Test (12 & 6) | Clunking or noticeable in-and-out play. | Worn Control Arm Ball Joint |
| Wiggle Test (9 & 3) | Clunky side-to-side play. | Worn Tie Rod Ball Joint |
| Pry Bar Test | Excessive movement between control arm and frame. | Worn Control Arm Bushings |
| Audible Noise | Clunking over bumps. | Worn Bushings, khớp bóng, or Stabilizer Link |
When to Consult a Professional Mechanic
While these at-home checks are incredibly useful, there are times when a professional diagnosis is necessary. A mechanic has several advantages:
- Vehicle Lift: A lift allows for much better access and a clearer view of all components. It also allows them to load and unload the suspension in specific ways to better diagnose certain issues.
- Experience: An experienced technician has seen hundreds of suspension failures and can often identify the source of a noise or vibration much more quickly and accurately. They can differentiate between a bad control arm, a worn strut mount, a faulty stabilizer link, or a problematic wheel bearing with greater certainty.
- Specialized Tools: They have a wider array of pry bars, chassis ears (electronic listening devices to pinpoint noises), and dial indicators to precisely measure play in a joint, removing guesswork.
You should consult a professional if:
- You are not comfortable or equipped to safely lift your vehicle.
- Your preliminary checks are inconclusive.
- You have performed the checks and identified a problem but want a second opinion before purchasing parts.
- The symptoms are severe (loud banging, very unstable steering) and require immediate attention.
Understanding the Connection to Other Suspension Components
It is rare for one suspension component to exist in isolation. The control arm works in tandem with the strut/shock absorber, the stabilizer link, and the tie rod end. A failure in one part can put additional stress on the others. Ví dụ, a completely failed control arm bushing can cause oscillations that accelerate wear on the shock absorber. A noise you attribute to a control arm could actually be from a worn stabilizer link, which is a smaller rod that connects the control arm or strut to the sway bar to control body roll. A proper diagnosis involves evaluating the entire system. A good mechanic will not just find the failed part; they will also look for collateral damage or other worn components that should be addressed at the same time. This holistic approach prevents you from having to make a return trip to the shop a few months later for a related failure.
The Replacement Process: A Comprehensive Overview
Once a faulty suspension control arm has been diagnosed, the only remedy is replacement. This is not a component that can be repaired; it is a sealed unit (or an assembly of parts) that must be replaced entirely. The process can range from moderately difficult to highly complex, depending on the vehicle's design and the amount of corrosion present. For many enthusiasts, it presents a challenging but rewarding DIY project. For others, it is a job best left to the professionals. Understanding the steps involved is valuable for either path you choose.
Is DIY Replacement Feasible? A Reality Check
The decision to replace a control arm yourself hinges on three factors: your mechanical skill level, your access to the proper tools, and your willingness to invest the time.
- Skill Level: This is not a job for a beginner. You should be comfortable with safely lifting and supporting a vehicle, using hand and power tools, and applying significant force to break loose stubborn bolts. You need a good understanding of how suspension components fit together.
- Tools: A basic socket set will not suffice. You will likely need a large breaker bar, a torque wrench, a ball joint separator tool (a "pickle fork" or a press-style separator), heavy-duty jack stands, and potentially an impact wrench to deal with rusted fasteners.
- Time and Patience: On a new vehicle in a dry climate, the job might take a couple of hours per side. On an older vehicle from a region where road salt is used, the job can turn into an all-day battle against seized bolts, requiring heat, penetrating oil, and immense frustration. A bolt that snaps off in the subframe can turn a weekend project into a major repair.
If you are hesitant about any of these aspects, having a professional perform the work is the wisest choice. The labor cost is often reasonable and buys you peace of mind and a guarantee on the work.
Tools and Preparation for the Job
If you decide to proceed, preparation is everything. First, acquire the correct replacement control arm assembly for your specific year, make, and model. It is highly recommended to purchase the entire arm, which comes with new bushings and a new ball joint pre-installed. This is far easier than trying to press old bushings and a ball joint out of the old arm.
Your tool checklist should include:
- Safety Glasses and Gloves
- Floor Jack and Jack Stands
- Wheel Chocks
- Socket Set (metric and/or standard, including deep sockets)
- Bộ cờ lê
- Breaker Bar (1/2" drive or larger)
- Cờ lê mô-men xoắn
- Ball Joint Separator
- Pry Bar
- Hammer or Mallet
- Penetrating Oil (apply generously to all bolts hours or even a day before you start)
- Wire Brush (for cleaning threads)
Step-by-Step Guide: Replacing a Front Lower Control Arm
The following is a generalized guide for a common MacPherson strut front suspension. The exact steps will vary significantly between vehicles, so always consult a vehicle-specific repair manual.
- Preparation: Park on a level surface, engage the parking brake, and chock the rear wheels. Loosen the lug nuts on the wheel you are working on, but do not remove them.
- Lift and Secure: Jack up the front of the vehicle and place jack stands securely under the frame or subframe. Remove the wheel.
- Loosen Fasteners: Liberally spray all control arm-related bolts and nuts with penetrating oil. This includes the bolts holding the bushings to the frame and the nut on the ball joint stud.
- Separate the Ball Joint: Remove the cotter pin (if present) and loosen the large castle nut on the bottom of the ball joint stud. Do not remove it completely; back it off until it is flush with the end of the stud to protect the threads. Now, use your ball joint separator tool to pop the tapered stud out of the steering knuckle. This is often the most difficult step. A sharp strike with a heavy hammer on the side of the steering knuckle where the stud passes through can also work to shock it loose. Once the stud is free, remove the nut.
- Disconnect Other Components: You may need to disconnect the outer tie rod ball joint from the steering knuckle or the lower end of the stabilizer link from the control arm to gain enough clearance to move the knuckle out of the way.
- Remove the Bushing Bolts: With the ball joint free, you can now remove the bolts that hold the control arm's inner bushings to the vehicle's subframe. These are often very tight and may require a long breaker bar. Note their orientation for reassembly.
- Remove the Old Arm: With all fasteners removed, the old control arm can now be wiggled and pried out of the vehicle.
- Install the New Arm: Compare the new arm to the old one to ensure it is a perfect match. Maneuver the new arm into position.
- Hand-Tighten Fasteners: Install the bushing bolts and the ball joint nut, but only tighten them by hand for now. Do not fully torque them yet. This is a common and critical mistake.
- Load the Suspension: Use your floor jack to lift the entire steering knuckle and hub assembly, compressing the suspension until the vehicle's weight is resting on the jack (and the jack stand is just there for safety). The vehicle should be at its normal ride height.
- Final Torque: With the suspension loaded to its normal ride height, now you can use your torque wrench to tighten all the bushing bolts and the ball joint nut to the manufacturer's specified torque values. Tightening the bushings while the suspension is hanging down will cause them to be twisted and under tension at normal ride height, leading to premature failure.
- Reassemble and Lower: Reinstall any other components you disconnected. Put the wheel back on, hand-tighten the lug nuts, lower the vehicle to the ground, and then torque the lug nuts to spec.
The Indispensable Final Step: Wheel Alignment
Replacing a control arm, a tie rod ball joint, or any other major suspension component will invariably alter the vehicle's wheel alignment. Even if the new part is identical to the old one, manufacturing tolerances and slight shifts in position mean the alignment will be off. Skipping this step will negate all your hard work, leading to crooked steering, pulling, and rapid, lốp mòn không đều. After the replacement is complete, you must take the vehicle to a qualified shop for a full four-wheel alignment. This is not an optional step; it is the final, essential part of the repair process. It ensures all the angles are reset to factory specifications, allowing your new components to work correctly and protecting your investment in tires.
Beyond the Control Arm: A Holistic View of Suspension Health
A vehicle's suspension is not a collection of independent parts; it is an interconnected ecosystem. The health and performance of one component directly affect the others. Focusing solely on a single part, like a suspension control arm, while ignoring its neighbors is a shortsighted approach to maintenance. A truly robust and reliable vehicle requires a holistic understanding of how these parts collaborate. Developing this perspective allows for more effective diagnosis, smarter repairs, and ultimately, a safer and more satisfying driving experience. When you ponder how long do control arms last, you should also consider the lifespan of the components they work with every day.
The Symbiotic Relationship with Tie Rod Ends and Ball Joints
The control arm's ball joint and the tie rod end's ball joint live side-by-side, attached to the same steering knuckle, yet they serve different masters. The control arm ball joint is the pivot for vertical suspension movement, bearing the vehicle's weight. The tie rod ball joint is the pivot for the steering linkage, transmitting your inputs from the steering wheel to the wheels. They are in a symbiotic relationship.
A severely worn control arm ball joint that allows the wheel to wobble and vibrate will inevitably transmit those destructive forces to the tie rod end, accelerating its wear. Conversely, a loose tie rod end can create steering shimmy that puts extra stress back on the control arm's components. When diagnosing a front-end issue, it's crucial to check both. A "wiggle test" at the 12 Và 6 o'clock positions primarily tests the control arm ball joints, while a test at the 9 Và 3 o'clock positions primarily tests the tie rod ends. Often, if one is worn out due to high mileage or harsh conditions, the other is not far behind. For this reason, when performing major front-end work, it is often wise and cost-effective to replace control arms and tie rod ends at the same time.
The Role of the Stabilizer Link in Body Roll
Another close neighbor to the control arm is the stabilizer link, also known as a sway bar link. This is a relatively simple rod with a small ball joint or bushing at each end. It connects the end of the vehicle's stabilizer bar (sway bar) to the suspension control arm or the strut assembly. Its sole purpose is to transfer force from one side of the suspension to the other during cornering to counteract body roll.
When you enter a turn, the outside of the car's body tends to dip, and the inside tends to lift. The stabilizer link on the outside of the turn pushes up on the stabilizer bar, which twists and then pulls down on the link on the inside of the turn, helping to keep the car level.
The small ball joints on a stabilizer link are wear items, just like any other. When they wear out, the most common symptom is a clunking or rattling noise over small, sharp bumps, especially when driving straight at low speeds. Because this sound is so similar to a worn control arm bushing, it is a frequent source of misdiagnosis. A worn stabilizer link will generally not cause the steering wander or tire wear associated with a bad control arm, but its noise can be just as alarming. Checking for play in the stabilizer link joints is a simple matter of grabbing the link and trying to move it. Any looseness or noise indicates it needs replacement.
A Proactive Maintenance Philosophy for Your Suspension
Adopting a proactive rather than a reactive approach to suspension maintenance can save you money, time, and potential danger.
- Inspect Regularly: Make suspension inspection a part of your routine maintenance. Every time you rotate your tires is a perfect opportunity for a quick visual and physical check of the bushings, khớp bóng, and links.
- Replace in Pairs: Suspension components should always be replaced in pairs (both left and right sides). Even if only one side is showing severe symptoms, the other side has endured the same mileage and conditions. Replacing only one side will result in unbalanced handling, where one side of the car responds differently from the other. This can be unpredictable and unsafe.
- Bundle Your Repairs: If you are paying for the labor to replace a control arm, and a wheel alignment is required afterward, it is the perfect time to address any other worn front-end parts. The incremental labor cost to also replace the tie rod ends or stabilizer links at the same time is minimal compared to doing it as a separate job later, which would require another alignment.
- Listen to Your Car: Pay attention to the new sounds and sensations your vehicle makes. The subtle clunk or minor vibration you notice today could be the early warning of a problem that will be much more severe in a few thousand miles. Addressing issues early, when they are small, prevents them from causing collateral damage to other parts of the system.
This holistic philosophy transforms maintenance from a series of emergency repairs into a managed process of upkeep, ensuring your vehicle remains as safe, comfortable, and responsive as its engineers intended.
Câu hỏi thường gặp (Câu hỏi thường gặp)
Can I drive with a bad control arm?
While it is physically possible to drive with a failing control arm, it is strongly discouraged and can be extremely dangerous. A worn control arm compromises steering control, can cause excessive tire wear, and affects braking stability. In a worst-case scenario, a completely failed ball joint or bushing could cause a loss of control over the wheel, potentially leading to an accident.
How much does it cost to replace a control arm in 2025?
The cost varies widely based on the vehicle, the part's price, and local labor rates. The part itself can range from $70 for a simple stamped steel arm for a common sedan to over $500 for a complex aluminum arm for a luxury vehicle. Labor typically takes 1.5 ĐẾN 3 hours per side. Including the mandatory wheel alignment, you can expect the total cost to be anywhere from $400 ĐẾN $1,200+ per arm.
Should I replace control arms in pairs?
Yes, it is always recommended to replace control arms in pairs (both left and right sides). Both arms have experienced the same mileage and road conditions. Replacing only one can result in an imbalance in handling and suspension response, as one side will be tight and new while the other remains worn. This can make the vehicle's behavior unpredictable, especially in emergency maneuvers.
What's the difference between an upper and a lower control arm?
In a double-wishbone suspension, the lower control arm is typically larger and bears most of the vehicle's weight and cornering forces. The upper control arm is usually smaller and serves primarily to maintain the wheel's camber angle during suspension travel. In a MacPherson strut system, there is only a lower control arm; the strut itself functions as the upper locating point.
Does a bad control arm affect braking?
Yes, a bad control arm can significantly affect braking. When you apply the brakes, the vehicle's weight shifts forward, putting immense force on the front suspension. Worn bushings can allow the control arm to shift forward or backward during braking, causing the wheel to change its toe angle. This can result in a pull to one side, instability, or a loud clunk upon brake application.
How do symptoms of a worn tie rod ball joint differ from a bad control arm?
A worn control arm ball joint typically causes clunking over bumps, steering wander, and uneven tire wear on the inner or outer edges (camber wear). A worn tie rod ball joint, which is part of the steering linkage, primarily causes a loose or vague feeling in the steering wheel, a shimmy that you can feel when turning, and feathered or scalloped tire wear across the tread. A physical "wiggle test" is the best way to differentiate them.
What happens if I ignore a bad stabilizer link?
Ignoring a worn stabilizer link will primarily result in an annoying clunking or rattling noise over bumps. While not as immediately dangerous as a bad control arm, it can negatively impact handling by allowing for more body roll during cornering, making the vehicle feel less stable. Theo thời gian, the link could potentially break, which would cause a sudden change in handling characteristics during a turn.
Phần kết luận
The suspension control arm stands as a testament to the elegant yet brutal reality of automotive engineering. It is a component born of the need to reconcile comfort with control, to allow for motion while enforcing stability. The investigation into how long do control arms last reveals that their lifespan is not a fixed number but a story written by mileage, time, environment, and human behavior. The rubber bushings and articulating ball joints are finite components, sacrificial lambs to the laws of physics and friction. Their eventual failure is not a matter of if, but when.
Recognizing the symptoms of their decline—the vibrations through the steering wheel, the clunks from below, the wandering path of the vehicle—is a fundamental responsibility of ownership. These are not mere annoyances; they are critical communications about the integrity of the system that connects you to the road. Acting on these warnings by performing thorough inspections and timely, high-quality repairs is paramount. Whether you choose the path of a DIY enthusiast or entrust the work to a professional, the principles remain the same: use quality parts, replace them in pairs, and always finalize the job with a proper wheel alignment. By respecting the intricate dance of the suspension system and tending to its needs, you ensure your vehicle remains safe, predictable, and a pleasure to drive for many years and miles to come.
Tài liệu tham khảo
McCuistian, R. (2025, Tháng tư 12). What do control arms do? CarParts.com.
Gillespie, T. D. (1992). Fundamentals of vehicle dynamics. Society of Automotive Engineers (SAE).
Jiahang. (2025, Tháng tư 9). What does a control arm do in a car? | Functions, types & maintenance guide. Jiahang Aero. https://www.jiahangaero.com/What-Does-a-Control-Arm-Do-in-a-Car-id44476936.html
Mazzella, R. (2023, Tháng tám 17). What are suspension control arms? What do they do? How do they work? 10 Second Racing. https://10secondracing.com/blogs/automotive-suspension-system-technical-articles/what-are-suspension-control-arms-what-do-they-do-how-do-they-work
National Highway Traffic Safety Administration. (n.d.). Vehicle safety & recalls. NHTSA.
ZG Car Parts. (2025, Tháng tư 14). A comprehensive guide to vehicle control arms. https://www.zgcarparts.com/media/a-comprehensive-guide-to-vehicle-control-arms.html
TGQ Auto. (2024, Tháng Một 19). The essential guide to control arms in vehicle suspensions. https://tgq-auto.com/the-essential-guide-to-control-arms-in-vehicle-suspensions/
Deltona Discount Tires. (2023, Tháng tám 8). Suspension simplified: Everything you need to know about control arms. https://www.deltonatire.com/Blog/ArticleID/33/Suspension-Simplified-Everything-You-Need-to-Know-About-Control-Arms