


Абстрактный
The functional integrity of a vehicle's suspension system is predicated on the condition of its constituent parts, among which the control arm bushings play a pivotal, albeit often overlooked, роль. This document examines the procedural intricacies involved in the replacement of worn or failed control arm bushings, a common maintenance task necessitated by material fatigue and operational stress. It provides a systematic analysis of the diagnostic process, beginning with the identification of auditory and tactile symptoms such as clunking noises, steering imprecision, и неравномерный износ шин. A detailed exposition of the required tools and safety protocols is presented, followed by a critical evaluation of the decision between replacing the bushings individually versus installing a complete control arm assembly. The guide offers a sequential, step-by-step methodology for the removal of the existing control arm, the extraction and installation of the bushings using appropriate press tools, and the subsequent reinstallation of the component. Emphasis is placed on the necessity of preloading the suspension before final torque application and the non-negotiable requirement of a post-repair wheel alignment to restore factory-specified vehicle geometry and ensure safety.
Ключевые выводы
- Identify bad bushings by listening for clunks, feeling steering wander, and visually inspecting for cracks.
- Decide between replacing just the bushing or the entire control arm assembly based on cost and condition.
- Use a hydraulic press or a specialized C-clamp tool for safe and effective bushing removal and installation.
- Always preload the suspension before applying the final torque to the control arm mounting bolts.
- Learning how to replace control arm bushings properly can significantly improve your vehicle's handling and safety.
- A professional wheel alignment is mandatory after the replacement to prevent premature tire wear.
- Ensure all fasteners are tightened to the manufacturer's specified torque values for a secure repair.
Оглавление
- Understanding the Role of Control Arm Bushings
- Шаг 1: Diagnosing Worn Control Arm Bushings
- Шаг 2: Assembling Your Tools and Preparing for the Job
- Шаг 3: The Critical Decision – Bushing Only vs. Full Control Arm Assembly Replacement
- Шаг 4: Removing the Old Control Arm
- Шаг 5: The Main Event – Replacing the Bushings
- Шаг 6: Reinstallation and Torque Specifications
- Шаг 7: Final Checks and Post-Replacement Wheel Alignment
- Часто задаваемые вопросы (Часто задаваемые вопросы)
- Заключение
- Ссылки
Understanding the Role of Control Arm Bushings
Before we can begin to explore the practicalities of replacement, a foundational understanding of the components themselves is in order. Think of your vehicle's suspension not as a rigid, unyielding structure, but as a complex system of levers and pivots, much like the limbs of a living creature. It must be both strong and flexible, capable of absorbing immense forces while maintaining precise control over the vehicle's motion. Within this intricate dance of physics and engineering, the control arm and its bushings serve as the humble yet fundamental connection points.
Что такое рычаг управления? A Suspension Primer
A control arm is a hinged suspension link between the chassis and the suspension upright or hub that carries the wheel. Как следует из названия, its primary function is to control the wheel's motion. When you drive over a bump, the wheel moves up and down. The control arm guides this vertical movement, ensuring the wheel stays in its proper alignment relative to the vehicle's body. Most modern passenger cars use an independent suspension system, where each wheel can move independently of the others. In these systems, you will typically find at least one lower control arm, and often an upper control arm as well, forming a parallelogram that allows for controlled wheel articulation (Запчасти МООГ, 2022). This linkage is what allows your car to glide smoothly over uneven surfaces while keeping the tires firmly planted for optimal grip and stability.
The Unsung Hero: The Bushing's Function
If the control arm is the bone of the suspension, the bushing is the cartilage. Это небольшой, typically rubber or synthetic cushion that is pressed into the mounting points of the control arm where it attaches to the vehicle's subframe. Its purpose is twofold. Первый, it acts as a pivot point, allowing the control arm to move up and down freely as the suspension articulates. Второй, it isolates the cabin from the harshness of the road. The bushing absorbs vibrations and impacts that would otherwise be transmitted directly from the wheels into the vehicle's frame, resulting in a noisy and uncomfortable ride. Without these bushings, every pebble and crack in the road would send a jarring shock through the car, and the metal-on-metal contact of the pivot points would wear out with astonishing speed. They are, in essence, the silent mediators between the road and the driver.
Materials and Design: From Rubber to Polyurethane
The character of a bushing is defined by its material. The vast majority of original equipment manufacturer (ОЕМ) bushings are made from a specific durometer (hardness) of rubber. Rubber is an excellent choice for production vehicles because it offers a superb balance of vibration absorption, flexibility, и экономическая эффективность. It provides the quiet, comfortable ride that most consumers expect. Some bushings are more complex, featuring a hydraulic, fluid-filled design to further dampen specific frequencies of vibration for an even smoother experience.
For those seeking enhanced performance, polyurethane bushings are a popular aftermarket alternative. Polyurethane is a much stiffer material than rubber. This stiffness significantly reduces the amount of deflection or "шпилька" in the suspension pivots. The result is a more direct and responsive feel, quicker steering turn-in, and more stable handling, particularly during aggressive cornering. This performance comes with a trade-off, однако. Because polyurethane is less compliant than rubber, it transmits more noise, вибрация, and harshness (NVH) into the cabin. The choice between rubber and polyurethane is a classic engineering compromise between comfort and performance. For a daily driven vehicle, OEM-style rubber bushings are often the most sensible choice, while a track-focused or performance-oriented car may benefit from the precision offered by polyurethane.
Шаг 1: Diagnosing Worn Control Arm Bushings
A failing control arm bushing does not typically fail catastrophically and suddenly. Rather, it degrades over time, offering a series of escalating clues to the attentive owner. Learning to interpret these signals is the first step in any successful suspension repair. The symptoms manifest in three primary sensory categories: what you hear, what you feel, and what you see.
Auditory Clues: Listening for Trouble
Your ears are often the first to detect a problem. Worn bushings lose their ability to hold the control arm securely. This allows for excess movement, which translates into noise.
- Clunking or Knocking: This is the most classic symptom. As you drive over bumps, выбоины, or uneven pavement, the loose control arm can knock against its mounting points on the subframe. The sound is often a low-frequency "компоновка" или "thud" that seems to come from a specific corner of the car.
- Creaking or Squeaking: A dry, degraded rubber bushing can create a creaking sound as the suspension moves up and down. This might sound similar to an old door hinge and is most noticeable at low speeds, например, при движении по парковке или выезде на подъездную дорожку.
Imagine you are turning the steering wheel while the car is stationary. If you hear a faint pop or creak from the front end, this can be the sound of a stressed bushing being forced to articulate beyond its normal range due to internal wear.
Tactile Feedback: Feeling the Symptoms Through the Steering Wheel
Because control arms are a direct link in the steering and suspension geometry, their degradation has a tangible effect on how the car feels to drive. The precise, communicative steering you once enjoyed can become vague and unpredictable.
- Steering Wander: This is a sensation that the car is "wandering" или "drifting" in its lane, requiring constant small corrections at the steering wheel to maintain a straight path, especially at highway speeds. The worn bushings allow for minute changes in wheel alignment (specifically caster and camber) as the suspension moves, causing the vehicle to pull one way or the other.
- Vague or Sloppy Steering: The steering may feel less responsive. There might be a noticeable "dead spot" на центре, where turning the steering wheel slightly has little to no effect on the car's direction. This is due to the "шпилька" from the worn bushings that must be taken up before the control arm can effectively translate steering inputs to the wheels.
- Braking Instability: В некоторых случаях, severe bushing wear can cause the vehicle to pull to one side during hard braking. As you apply the brakes, the forward momentum of the car places immense stress on the control arms. A worn bushing can allow the arm, and therefore the wheel, to shift its alignment under this load, causing a noticeable pull.
Визуальный осмотр: Что искать
While auditory and tactile symptoms are strong indicators, a visual inspection is necessary for a definitive diagnosis. This requires safely raising the vehicle and getting a clear look at the components.
| Симптом | Описание | Common Cause |
|---|---|---|
| Clunking/Knocking Noises | A solid "thud" sound when driving over bumps or uneven surfaces. Most prominent from the front suspension. | Excessive play in the control arm bushing allows the metal sleeve to impact the subframe mount. |
| Steering Wander | The vehicle requires constant minor steering corrections to maintain a straight line, especially at higher speeds. | Worn bushings allow for dynamic changes in wheel alignment (caster/camber) as the suspension articulates. |
| Неровная одежда шин | Feathered or scalloped wear patterns on the inside or outside edge of the front tires. | The inconsistent wheel alignment caused by failing bushings scrubs the tire tread unevenly against the pavement. |
| Visible Cracks/Tears | Obvious signs of deterioration in the rubber material of the bushing. The rubber may look dry-rotted. | Age, heat cycles, and constant stress cause the rubber to perish and lose its structural integrity. |
When you have a clear view of the bushings, here is what to search for:
- Cracks and Tears: Look closely at the rubber part of the bushing. Healthy rubber is pliable and uniform. Degraded rubber will show visible cracks, from hairline fractures to large, obvious tears.
- Деформация: The central metal sleeve of the bushing should be perfectly centered. If it is sagging, offset, or appears to have shifted within the rubber, the bushing has failed internally.
- Fluid Leaks: If your vehicle is equipped with hydraulic (fluid-filled) втулки, look for any signs of dark, oily residue on or around the bushing and control arm. A leak indicates the internal bladder has ruptured, and the bushing's damping properties are gone.
- Pry Bar Test: This is the most definitive test. With the wheel off the ground, place a long pry bar between the control arm and the subframe, near the bushing. Gently attempt to lever the arm back and forth. A good bushing will allow for very little, if any, movement, and it will feel firm. A worn bushing will allow for noticeable play, often accompanied by the same clunking sound you heard while driving. This test directly reveals the excess clearance that is causing your symptoms.
Шаг 2: Assembling Your Tools and Preparing for the Job
Undertaking a suspension project like this one demands more than just ambition; it requires the right tools and a methodical approach to preparation. Attempting to tackle this work without the proper equipment will, at best, lead to immense frustration and, at worst, result in a damaged vehicle or personal injury. Let's build our toolkit and set up our workspace for success.
The Essential Toolkit: Wrenches, Розетки, and Safety Gear
This is not a job for a basic home toolset. The bolts associated with suspension components are large and often extremely tight, secured by years of road grime and corrosion.
Core Hand Tools:
- Выключатель Бар: A long-handled, non-ratcheting bar is your best friend for breaking loose stubborn bolts. A 1/2-inch drive breaker bar, по меньшей мере 24 inches long, provides the necessary leverage.
- Динамометрический ключ: This is a non-negotiable tool. Suspension bolts must be tightened to a specific torque value to function correctly and safely. A 1/2-inch drive click-style or digital torque wrench that can read up to at least 150 ft-lbs (200 Nm) is required.
- Набор розеток: You will need a comprehensive set of 1/2-inch drive metric or imperial sockets, depending on your vehicle. Deep and standard-length sockets are useful. Common sizes range from 14mm to 24mm.
- Набор ключей: A good set of combination wrenches is needed for holding nut heads while you turn the bolt.
- монтировки: A set of various-sized pry bars is invaluable for persuading components to separate and align.
- Сепаратор шарового шарнира: Often called a "pickle fork," this wedge-shaped tool is used to separate the control arm's ball joint from the steering knuckle. A more refined scissor-style separator is less damaging to the ball joint boot if you plan to reuse it.
Защитное оборудование:
- Jack and Jack Stands: A high-quality hydraulic floor jack and, самое главное, a pair of heavy-duty jack stands rated well above your vehicle's weight are mandatory. Никогда не работайте под автомобилем, поддерживаемым только домкратом..
- Колесные колодки: Для предотвращения скатывания автомобиля в поднятом состоянии.
- Защитные очки: To protect your eyes from falling rust, грязь, и мусор.
- Перчатки механика: To protect your hands from cuts, царапины, and grease.
The Pressing Question: Bushing Press Tools vs. DIY Methods
Here we arrive at a pivotal choice that defines the difficulty of the job. If you are only replacing the bushings and not the entire control arm, you must have a way to press the old ones out and the new ones in.
| Метод | Расходы | Difficulty | Efficacy | Примечания |
|---|---|---|---|---|
| Hydraulic Shop Press | Высокий (purchase), Низкий (rent/shop use) | Низкий | Очень высокий | The professional standard. Provides even, controlled force. Best option if available. |
| Bushing Press C-Clamp Kit | Medium | Medium | Высокий | A large, heavy-duty C-clamp with various sleeves. Very effective for on-car or off-car use. |
| DIY Socket/Bolt Method | Очень низкий | Высокий | Medium | Uses a large bolt, nuts, washers, and sockets to slowly draw the bushing in/out. Prone to slipping. |
| The "Burn-Out" Метод | Низкий | Высокий & Hazardous | Низкий | Involves burning the rubber out with a torch. Messy, toxic fumes, and can damage the arm. Not recommended. |
- Hydraulic Shop Press: This is the gold standard. A floor-standing hydraulic press makes removing and installing bushings a trivial, five-minute task. Many automotive machine shops will press your bushings for a small fee if you bring them the control arm and the new parts. This is often the most sensible path.
- Bushing Press Kit: For the serious DIYer, a specialized kit containing a large, threaded press and a variety of receiver cups and adapters is an excellent investment. These kits allow you to perform the job without removing the control arm in some cases, and they work very well.
- DIY Methods: It is possible to use a combination of large sockets, threaded rod, nuts, and washers to create a makeshift press. This requires patience and can be frustrating, as the setup can be difficult to keep aligned. This path should only be considered if a proper press is absolutely unavailable.
Preparing Your Workspace and Vehicle
A clean, organized workspace is a safe and efficient workspace.
- Find Level Ground: Park the vehicle on a solid, level surface like a concrete garage floor or driveway. Never work on soft ground or an incline.
- Gather Everything: Before you lift the vehicle, lay out all your tools, new parts, and safety equipment. Having everything within arm's reach prevents unnecessary trips back and forth.
- Use Penetrating Oil: The day before you plan to do the work, liberally spray all the relevant nuts and bolts (control arm mounting bolts, ball joint nut) with a high-quality penetrating oil. This will make a world of difference in breaking them loose.
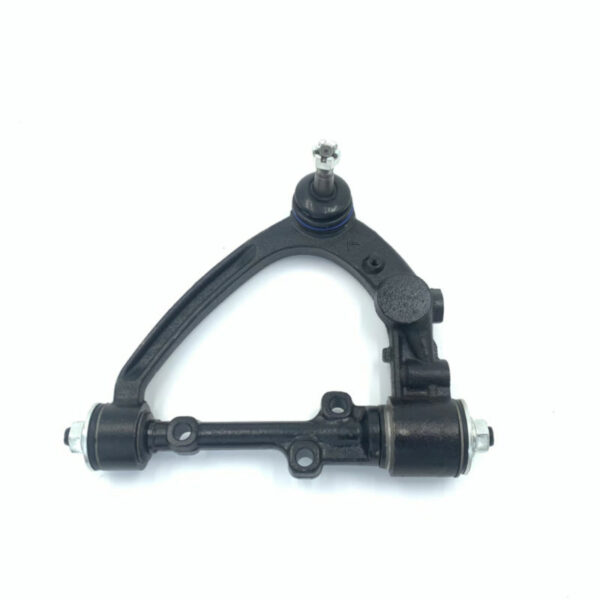
Шаг 3: The Critical Decision – Bushing Only vs. Full Control Arm Assembly Replacement
Before a single bolt is turned, you face a strategic choice that will profoundly impact the cost, difficulty, and longevity of your repair: do you press out the old bushings and install new ones into your existing control arm, or do you replace the entire control arm assembly, which comes with new bushings and a new ball joint already installed? This is not a simple question of right versus wrong; it is a nuanced decision based on several factors.
The Case for Replacing Bushings Only
The primary motivation for replacing only the bushings is economic. The bushings themselves are relatively inexpensive parts. If the metal control arm itself is in good condition—not bent, треснутый, or excessively rusted—and if the ball joint is also in good health, then replacing only the failed component makes logical sense. It aligns with a philosophy of repairing, not just replacing.
This route appeals to the purist and the budget-conscious mechanic. It requires more labor and specialized tools (a press, as discussed), but the outlay for parts is minimal. You are restoring the arm to its original function without discarding a large, perfectly serviceable piece of steel or aluminum. Однако, this path assumes that the other wear-and-tear component on the arm, шаровой шарнир, is still sound. If the ball joint is also worn, you will find yourself undertaking a second, similar repair in the near future, negating much of the initial cost savings.
The Argument for a Complete Control Arm Assembly
The alternative is to purchase a high-quality control arm assembly. These units are sold as a single part that includes the control arm, both inner bushings, and the outer ball joint, all pre-assembled from the factory. The argument for this approach is compelling and centers on efficiency, comprehensiveness, and long-term peace of mind.
- Time and Labor Savings: This is the most significant advantage. The difficult and time-consuming tasks of pressing out old bushings and pressing in new ones are completely eliminated. The job is simplified to a direct bolt-off, bolt-on procedure. For a professional mechanic, where time is money, this is almost always the preferred method. For a DIYer, it can turn a potentially frustrating weekend project into a manageable afternoon task.
- Comprehensive Renewal: A control arm assembly replaces all the wear items in one go. You get new bushings and a new ball joint. Ball joints and bushings are subjected to similar stresses and often have similar service lives. Replacing only the bushings on an arm with a high-mileage ball joint is a false economy. The ball joint is likely to fail soon, requiring you to remove the control arm all over again. Replacing the whole assembly resets the clock on all these components simultaneously.
- Guaranteed Fit and Function: With a pre-assembled unit, you eliminate the risk of improperly installing a bushing. Pressing a bushing in crooked, not seating it to the correct depth, or damaging it during installation can compromise the repair. A factory-assembled arm removes this variable.
Making an Informed Choice for Your Vehicle
So, how do you decide? Ask yourself these questions:
- What is the condition of my ball joints? During your visual inspection, check the ball joint boots for tears and use the pry bar to check for any vertical or horizontal play. If there is any doubt about the ball joint's health, replacing the entire assembly is the wiser choice.
- What is the overall condition of the control arm? Is it heavily rusted, potentially compromising its structural integrity? Has the vehicle ever been in a collision that could have bent the arm? Если так, replace the entire assembly.
- What tools do I have access to? Do you have a hydraulic press or a proper bushing press kit? If not, the labor and frustration involved in a DIY bushing replacement can quickly outweigh the cost savings.
- What is my budget versus my time worth? The assembly will cost more in parts, but the bushing-only route will cost you significantly more in time and potentially tool rental or machine shop fees.
For most situations involving a daily driven vehicle with over 80,000 мили (approx. 130,000 км), replacing the entire control arm assembly represents the best overall value. It is a more robust, эффективный, and reliable repair that prevents near-term future failures of adjacent components.
Шаг 4: Removing the Old Control Arm
With the preparatory steps completed and a strategic decision made, it is time to begin the physical work of disassembly. This stage requires a careful, methodical approach to ensure both safety and success. The goal is to free the control arm from its three connection points: the two inner pivot points on the subframe and the outer pivot point at the wheel's steering knuckle.
Safely Lifting and Supporting the Vehicle
This is the most safety-critical phase of the entire process.
- Заблокируйте задние колеса: Before you even touch the jack, place wheel chocks securely behind the rear tires to prevent any possibility of the car rolling backward. Engage the parking brake.
- Identify Jack Points: Consult your vehicle's owner's manual to identify the correct lifting points on the frame or subframe. Using the wrong point can damage the vehicle or create an unstable lift.
- Поднимите автомобиль: Position the floor jack under the designated lift point and raise the vehicle until the front wheel is several inches off the ground, providing enough clearance to work comfortably.
- Разместите подставки для Джека: This is the step that saves lives. Position a jack stand under a strong, solid part of the vehicle's frame or the designated subframe support point. Never place it under a suspension component. Slowly lower the jack until the vehicle's weight is resting securely on the jack stand. Give the vehicle a firm push to ensure it is stable. Repeat the process on the other side if you are replacing both control arms.
- Снимите колесо: Автомобиль надежно поддерживается, remove the lug nuts and take off the front wheel to gain access to the suspension.
Disconnecting the Ball Joint
The outer end of the control arm is connected to the steering knuckle via a ball joint. This tapered stud must be separated from the knuckle.
- Remove the Castle Nut: The ball joint stud will have a large nut, often a castle nut with a cotter pin passing through it. Remove the cotter pin with pliers and then use a wrench or socket to remove the nut. Do not discard it yet.
- Separate the Joint: The tapered fit of the ball joint stud holds it very tightly in the knuckle. It will not simply drop out.
- Метод 1: The Striking Method. Thread the nut back on a few turns until it is flush with the end of the stud. This protects the threads. Сейчас, use a small sledgehammer or heavy mallet to strike the part of the steering knuckle where the ball joint stud passes through. The shock of the blow will pop the tapered stud loose. It may take several sharp, forceful strikes. Do not hit the control arm or the stud itself.
- Метод 2: Сепаратор шарового шарнира. А "pickle fork" can be hammered in between the control arm and knuckle to wedge them apart, but this will almost certainly destroy the rubber boot on the ball joint. A scissor-style separator is a better option if you need to preserve the joint, as it applies even pressure to press the stud out.
Unbolting the Control Arm from the Frame
Now focus on the inner mounting points. The control arm typically has two bushings, each secured to the subframe by a large bolt and nut.
- Mark Alignment Cams: Some vehicles use eccentric bolts or "cam bolts" on one of the inner pivots to adjust wheel alignment (specifically, camber or caster). If you see a bolt head with markings and a large, off-center washer, it is an alignment cam. Before loosening it, use a paint marker or scribe to mark the exact position of the cam relative to the subframe. This will help you get the alignment "close enough" upon reassembly to safely drive to an alignment shop.
- Break the Bolts Loose: These bolts are notoriously tight. This is where your long breaker bar is indispensable. You may need to use a wrench on the nut while turning the bolt head.
- Remove the Bolts and Arm: Once the nuts are off, you may need to tap the bolts out with a hammer and punch. With both inner bolts and the outer ball joint disconnected, the control arm should now be free. It may require some wiggling and prying to maneuver it out of its mounts.
Take a moment to compare the old arm with your new part. Verify that the shape, mounting points, and ball joint taper are identical. This quick check can save a lot of trouble later.
Шаг 5: The Main Event – Replacing the Bushings
If you have opted to replace the entire control arm assembly, you can joyfully skip this entire section and move directly to reinstallation. For those who have chosen the path of replacing the bushings individually, this is the heart of the operation. The process requires force, точность, and the right tools. We will assume the control arm is now removed from the vehicle and secured in a sturdy bench vise.
Using a Hydraulic Press for Bushing Removal
A hydraulic press is the most efficient and professional tool for this job.
- Select Support and Press Adapters: Find a receiver cup or piece of thick-walled pipe that is slightly larger in diameter than the outside of the bushing's metal shell. This will support the control arm while allowing the bushing to be pressed out. Затем, find a press adapter or a large socket that is slightly smaller than the bushing's shell but makes solid contact with its metal lip.
- Position the Arm: Place the control arm on the press bed, supported by your receiver cup. Ensure it is stable and that the bushing is centered under the press ram.
- Apply Pressure: Place your press adapter on top of the bushing. Slowly begin to pump the hydraulic press. You will see the pressure gauge climb as the press takes up the slack. There will be a loud "поп" или "bang" as the interference fit is broken and the bushing begins to move.
- Press it Out: Continue to apply steady pressure until the bushing is pressed completely out of the control arm and into the receiver cup below.
Alternative Removal Techniques (The "Hard Way")
Without a hydraulic press, the job becomes more challenging. A heavy-duty bench vise and a bushing press C-clamp kit are the next best things. The principle is the same: use a large threaded screw to draw the bushing out. If you are resorting to a DIY socket method:
- Assemble Your Press: Find a socket that is slightly larger than the bushing shell (the receiver) and one that is slightly smaller (the presser).
- Use a Bolt: Pass a long, high-strength bolt through the presser socket, the bushing, and the receiver socket.
- Tighten to Press: Place a large washer and nut on the end of the bolt. Hold one end with a wrench and begin tightening the other with another wrench or a ratchet. This will slowly draw the old bushing out of the arm and into the larger receiver socket. This method requires significant physical effort and care to keep everything aligned.
Pressing in the New Bushings Correctly
Installing the new bushing is the reverse of removal, but with more finesse required to avoid damage.
- Clean the Bore: Thoroughly clean the inside of the control arm bore where the bushing sits. Use a wire brush or emery cloth to remove any rust, burrs, or old rubber. The surface should be clean and smooth.
- Lubricate (If Necessary): The question of lubrication is contentious. For rubber bushings, a tiny amount of soapy water or a specialized rubber-safe lubricant can ease installation. Never use petroleum-based grease or oil, as it will attack the rubber and cause premature failure. For polyurethane bushings, use the silicone-based grease supplied by the manufacturer.
- Note the Orientation: Some bushings are "clocked," meaning they must be installed in a specific rotational orientation to function correctly. Look for alignment marks or tabs on the new bushing and corresponding marks on the control arm. Match them precisely.
- Press it In: Using your hydraulic press or press tool, carefully align the new bushing with the bore. Ensure it is starting perfectly straight. Apply slow, steady pressure. Watch carefully to make sure it does not tilt or bind. Press it in until it is fully seated. The outer lip of the bushing shell should be flush with the face of the control arm, or pressed to the same depth as the original. If you press it in too far, you may have to press it out and start over.
Once the new bushings are installed, your refurbished control arm is ready to be returned to the vehicle.
Шаг 6: Reinstallation and Torque Specifications
The process of reassembly is largely the reverse of removal, but with one exceptionally important difference: the final tightening of the inner pivot bolts. How and when you perform this step is the difference between a successful, long-lasting repair and one that fails in a matter of weeks.
Positioning and Fastening the New Control Arm
- Maneuver the Arm into Place: Wiggle the control arm back into its mounting brackets on the subframe. This can sometimes require a bit of persuasion with a pry bar to get the bolt holes to line up.
- Install Inner Bolts Loosely: Insert the two inner mounting bolts. If you had an alignment cam, make sure to align it with the marks you made earlier. Thread the nuts on but leave them loose enough that the control arm can still pivot freely up and down. Do not tighten them yet.
- Connect the Ball Joint: Swing the control arm up and guide the ball joint stud into the steering knuckle. You may need to push down on the control arm to get it to seat. Install the castle nut and tighten it to the manufacturer's specified torque. If it's a new nut, tighten it to the spec; if you're reusing the old one, tighten it until you can align a slot in the nut with the hole in the stud to insert a new cotter pin. Никогда не ослабляйте гайку, чтобы совместить отверстие.; always tighten further to the next available slot.
The Importance of Loading the Suspension Before Final Torque
This is the most frequently missed step in a DIY control arm replacement, and it is the most common cause of premature bushing failure. Think about the bushing's job. It is a rubber pivot designed to twist as the suspension moves. When the car is sitting on the ground, the suspension is at its normal, static ride height. This is the neutral, untwisted position the bushing should be in. If you tighten the inner bolts while the suspension is hanging in the air (unloaded), you are locking the bushing in a drooped position. Затем, when you lower the car onto the ground, the suspension compresses to ride height, forcing the rubber bushing to twist significantly and remain under a constant state of torsional stress. This pre-loaded tension will cause the rubber to tear and fail very quickly.
To do it correctly:
- Support the Arm: With the car still on jack stands, place your floor jack under the newly installed control arm (use a block of wood to avoid damage) near the ball joint.
- Raise the Suspension: Slowly raise the jack, which will compress the suspension. Watch the vehicle's body. You want to raise the control arm until it has just started to lift the vehicle's weight off the jack stand. Это имитирует нормальную высоту дорожного просвета..
- Torque the Bolts: Сейчас, with the suspension loaded, you can access the inner control arm bolts and tighten them to the manufacturer's specified torque value using your torque wrench. This ensures you are locking the bushings in their neutral, unloaded state.
Reconnecting All Components
Once the control arm bolts are torqued, you can lower the floor jack, reinstall the wheel, and tighten the lug nuts in a star pattern. Lower the vehicle completely to the ground and then perform a final torque on the lug nuts. Double-check that all tools have been removed from the work area.
Шаг 7: Final Checks and Post-Replacement Wheel Alignment
The mechanical work is complete, but the job is not finished. The final steps are about verification and restoration of the vehicle's precise geometric settings, which is paramount for safety and performance.
Test Driving and Listening for Changes
A post-repair test drive is essential for confirming the success of your work.
- Choose a Safe Route: Start with a slow drive around a quiet neighborhood or an empty parking lot.
- Listen Carefully: The clunking, треск, or creaking noises that prompted the repair should be gone. The suspension should feel "tighter" and more composed. Listen for any new or unusual sounds.
- Feel the Steering: Pay attention to the steering. It should feel more direct and responsive. The "бродить" или "шпилька" should be significantly reduced or eliminated.
- Perform Gentle Maneuvers: Make some gentle turns and go over small bumps. The car should feel stable and predictable. Avoid aggressive driving until you have had the alignment checked.
If you hear any loud bangs, feel a sudden shift in the steering, or sense anything that feels unsafe, pull over immediately and re-inspect your work.
Why a Professional Wheel Alignment is Non-Negotiable
You may have carefully marked your alignment cams, but replacing major suspension components like control arms will always alter the vehicle's wheel alignment. Even a brand new durable suspension component will have manufacturing tolerances that differ slightly from the old part. Driving for an extended period with improper alignment will, без вопросов, lead to a host of problems.
- Tire Destruction: Incorrect camber or toe settings will cause rapid and uneven tire wear. A brand new set of tires can be ruined in just a few thousand miles. The cost of a single tire often exceeds the cost of an alignment.
- Poor Handling: An improperly aligned car may pull to one side, have twitchy or unstable steering, and exhibit poor cornering behavior. This is not just an annoyance; it is a safety hazard.
- Increased Component Wear: Misalignment places undue stress on other steering and suspension parts, including tie rods, шаровые шарниры, and wheel bearings, leading to further premature failures.
Think of it this way: the control arm replacement is the surgery, and the wheel alignment is the physical therapy that ensures the patient heals correctly. Schedule an appointment with a reputable alignment shop as soon as possible after completing the repair. They have the sophisticated laser-guided equipment needed to measure and adjust the camber, заклинатель, and toe angles back to the precise specifications set by the vehicle manufacturer.
Long-Term Care and Inspection
Your new bushings and control arms should provide tens of thousands of miles of trouble-free service. To maximize their life, it is good practice to perform a quick visual inspection of the suspension components whenever you rotate your tires or perform an oil change. Look for the same signs of wear you did during your initial diagnosis: check for any new cracks in the bushings, torn ball joint boots, or signs of looseness. Catching a developing issue early is always easier and cheaper than addressing a complete failure down the road. By following this complete guide on how to replace control arm bushings, you have not only saved money but have also gained an intimate understanding of a critical system on your vehicle.
Часто задаваемые вопросы (Часто задаваемые вопросы)
Can I drive with a bad control arm bushing? While it is physically possible to drive for a short period, it is strongly discouraged. A worn bushing compromises steering control, braking stability, and can lead to rapid, неравномерный износ шин. A completely failed bushing could allow for enough movement to cause a loss of control, making it a significant safety risk.
How much does it cost to replace control arm bushings? The cost varies widely. If a professional mechanic replaces only the bushings, the cost might be $200-$400 под рукой, as the labor to press them is high. If they replace the entire control arm assembly, the cost could be $300-$700 под рукой, with the part itself being more expensive but the labor being less. Performing the work yourself significantly reduces the cost to the price of the parts, which can range from $20 for a bushing kit to $80-$250 for a complete assembly.
How long does it take to learn how to replace control arm bushings? For an experienced DIY mechanic, replacing a full control arm assembly can take 1-2 часов на сторону. For a novice, it could be a 3-5 hour job. If you are pressing the bushings yourself without a hydraulic press, you should budget at least 4-6 часов на сторону, as getting the old bushings out can be very time-consuming.
Is replacing the whole control arm easier than just the bushings? Да, overwhelmingly so. Replacing the entire control arm assembly eliminates the most difficult and tool-intensive part of the job: pressing the bushings in and out. It turns the repair into a more straightforward bolt-off, bolt-on procedure, making it a much more accessible job for the average DIY mechanic.
Do I need an alignment after replacing control arm bushings? Абсолютно, да. It is not optional. Replacing a control arm or its bushings will alter the vehicle's suspension geometry. Failure to get a professional wheel alignment shortly after the repair will result in poor handling, небезопасные характеристики вождения, and rapid destruction of your tires.
What are the main symptoms of a worn lower control arm bushing? The most common symptoms are a clunking or knocking sound from the front end when going over bumps, a feeling of "sloppy" or vague steering, the vehicle wandering or pulling to one side, and uneven or premature wear on the inside edge of the front tires.
Polyurethane or rubber bushings: which is better? "Better" depends on your goal. For a standard passenger car, OEM-style rubber bushings are better because they provide a quiet, comfortable ride by absorbing vibrations. For a performance or track car, polyurethane bushings are better because their stiffness reduces suspension deflection, leading to sharper, more responsive handling, at the cost of increased ride harshness and noise.
Заключение
The process to replace control arm bushings is an endeavor that bridges the gap between routine maintenance and significant mechanical repair. It is a task that demands respect for safety protocols, an appreciation for the correct tools, and a clear understanding of the underlying mechanical principles. From the initial diagnosis based on subtle sounds and feelings to the final, critical step of a professional wheel alignment, each phase is linked in a chain of cause and effect. A loose bolt leads to a clunk; a worn bushing leads to steering wander; a skipped alignment leads to ruined tires.
We have explored the pivotal decision between a targeted bushing replacement and a comprehensive assembly swap, concluding that for most modern applications, the efficiency and long-term reliability of a full assembly offer superior value. We have detailed the methodical steps of removal, the crucial technique of loading the suspension before final tightening, and the absolute necessity of post-operative alignment. Embarking on this repair is more than just a cost-saving measure; it is an educational journey into the heart of your vehicle's dynamics. It fosters a deeper connection with your machine and imparts the confidence that comes from restoring its safety, стабильность, and precision with your own hands.
Ссылки
1A Auto. (2020, Может 19). Контрольные рычаги 101: What do upper and lower control arms do?1aauto.com
CarParts.com. (2025, февраль 4). Что делают контрольные рычаги?
Гиллеспи, Т. Д. (1992). Основы динамики автомобиля. Общество автомобильных инженеров (САЭ) International.
JiahangAero. (2025, апрель 9). What does a control arm do in a car? | Функции, типы & maintenance guide. jiahangaero.com
Запчасти МООГ. (2022). Руководство по контролю над оружием.
Reimpell, J., Stoll, H., & Betzler, Дж. Вт. (2001). The automotive chassis: Engineering principles. Butterworth-Heinemann.
Он моторизован. (2022, ноябрь 29). Полное руководство по рычагам управления автомобилем.