


خلاصة
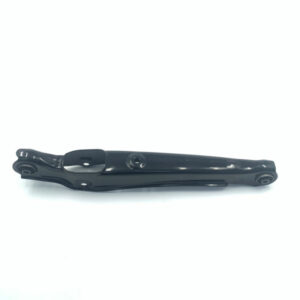
يعد ذراع التحكم السفلي الأيسر مكونًا أساسيًا لنظام التعليق الأمامي للسيارة, بمثابة حلقة وصل محورية بين الهيكل ومفصل التوجيه, الذي يحمل العجلة الأمامية. تعد سلامتها الهيكلية ووظيفة البطانات المدمجة والمفاصل الكروية أمرًا بالغ الأهمية للحفاظ على المحاذاة الصحيحة للعجلات, استجابة التوجيه, وجودة الركوب. تتناول هذه الوثيقة الدور المعقد لمكون السيارة بذراع التحكم السفلي الأيسر, استكشاف الأعراض الدقيقة التي تشير إلى فشله, مثل التشويش المسموع, عدم استقرار التوجيه, والتآكل غير المتساوي للإطارات. ويوفر إطارا مفصلا للتشخيص الدقيق, التمييز بين مشكلات ذراع التحكم والأعطال في الأجزاء ذات الصلة مثل قضيب الربط أو وصلة التثبيت. يمتد الخطاب إلى العلوم المادية لقطع الغيار, الصلب المختوم المتناقض, الحديد الزهر, والإنشاءات الألومنيوم. منهجي, يتم تقديم دليل خطوة بخطوة للاستبدال, مع التأكيد على الدقة والسلامة الإجرائية. ويختتم التحليل بمعالجة ضرورات ما بعد التثبيت, ولا سيما المتطلبات غير القابلة للتفاوض لمحاذاة العجلات بشكل احترافي لاستعادة ديناميكيات السيارة وضمان الموثوقية على المدى الطويل.
الوجبات السريعة الرئيسية
- قم بتشخيص أصوات فرقعة أو تجوال التوجيه للتأكد من فشل ذراع التحكم قبل شراء الأجزاء.
- حدد جزءًا عالي الجودة من ذراع التحكم السفلي الأيسر للسيارة يتوافق مع التصميم المحدد لسيارتك.
- استخدم معدات السلامة المناسبة, بما في ذلك منصات جاك, قبل البدء بأي عمل معلق.
- قم دائمًا بربط مسامير جلبة ذراع التحكم عند ارتفاع الركوب العادي لمنع حدوث أي ضرر.
- قم بإجراء محاذاة احترافية للعجلات بعد الاستبدال لضمان السلامة والتعامل معها.
- افحص المكونات ذات الصلة مثل وصلة التثبيت وكرة قضيب الربط أثناء عملية الإصلاح.
- افهم أن الملاحظات الفنية الواضحة ضرورية لتوثيق العمل وضمان الشفافية (tvi-mp3.com).
جدول المحتويات
- الغوص العميق في التشخيص: تفسير الإشارات الدقيقة لسيارتك
- اختيار البديل الصحيح: دليل للمواد, تصميم, والجودة
- المرحلة التحضيرية: تمهيد الطريق لإصلاح ناجح
- الإجراء الجراحي: دليل منهجي لاستبدال ذراع التحكم السفلي الأيسر
- بروتوكول ما بعد التثبيت: ضمان طول العمر والأداء
- الأسئلة المتداولة (التعليمات)
- خاتمة
- مراجع
الغوص العميق في التشخيص: تفسير الإشارات الدقيقة لسيارتك
إن فهم صحة تعليق سيارتك يشبه تفسير الطبيب للأعراض الدقيقة للمريض. نظام التعليق ليس كيانًا واحدًا، بل عبارة عن تفاعل معقد بين الأجزاء المترابطة, ولكل منها دور محدد في إدارة القوى الهائلة المتولدة أثناء تحرك السيارة على الأسطح غير المستوية. يعد عنصر السيارة ذو ذراع التحكم السفلي الأيسر هو الممثل الأساسي في هذه الدراما الميكانيكية. عندما يبدأ بالفشل, لا يتم ذلك عادةً بصمت. بدلاً من, ينقل ضيقه من خلال مجموعة متنوعة من السمعات, اللمس, والإشارات البصرية. إن تعلم تفسير هذه الإشارات بدقة هو الخطوة الأولى والأكثر أساسية في أي إصلاح ناجح, منع التشخيص الخاطئ والاستبدال غير الضروري للمكونات الصحية. يتطلب نهجا صبور ومنهجي, الانتقال من الأعراض الأكثر وضوحًا إلى مؤشرات التآكل الأكثر دقة.
سيمفونية أصوات التعليق: فك رموز Clunks, بوبس, والآهات
إن العرض الأكثر شيوعًا الذي ينبه السائق إلى مشكلة محتملة في ذراع التحكم السفلي الأيسر هو الضوضاء. هذه ليست طبيعية, الأصوات الصامتة للتعليق الصحي في العمل; فهي حادة, تدخلي, ومثير للقلق في كثير من الأحيان. Imagine the sound of two heavy metal objects striking one another—a distinct "clunk" أو "knock." يُسمع هذا الصوت بشكل متكرر عند القيادة فوق المطبات, الحفر, أو حتى عيوب طفيفة في الطريق. يتم إنتاج الضوضاء عندما تسمح وصلة كروية أو جلبة مهترئة بالحركة المفرطة. المكونات المعدنية, والتي ينبغي أن تعقد بثبات في مكانها, أصبحت الآن حرة في التحرك والتأثير على مفصل التوجيه أو الإطار الفرعي للمركبة.
النظر في هذا السيناريو: أثناء تحولك إلى ممر ذو ميل طفيف, you hear a loud "pop" من جانب السائق الأمامي للسيارة. هذا الفرقعة هو صوت مفصل الكرة السفلي, تحت ضغط الدوران والتعليق العمودي, يتحول فجأة داخل مقبسه البالي. دليل سمعي شائع آخر هو صوت الأنين أو الصرير, خاصة عند السرعات المنخفضة أثناء تدوير عجلة القيادة أو التنقل في موقف السيارات. يشير هذا الصوت غالبًا إلى جلبة ذراع التحكم الجافة أو المتدهورة. المطاط, بعد أن فقدت مرونتها, أصبح الآن ملتويًا ومقيدًا على غلافه المعدني, خلق صوت يشبه إلى حد كبير مفصل الباب الذي يصدر صريرًا. مفتاح التشخيص هو ربط الصوت بحركة محددة للمركبة. تشير الضربة فوق النتوء إلى تآكل التأثير الرأسي, بينما يشير التأوه أثناء الانعطاف البطيء إلى ضغط دوراني على الجلبة.
ردود الفعل اللمسية: الشعور بالفشل من خلال عجلة القيادة
أبعد مما تسمع, يتصل جزء السيارة بذراع التحكم السفلي الأيسر الفاشل من خلال ما تشعر به, في المقام الأول من خلال عجلة القيادة. نظام توجيه السيارة متصل مباشرة بنظام التعليق, and any looseness or "play" في ذراع التحكم سوف يترجم إلى تدهور في دقة التوجيه. One of the most telling signs is "steering wander." هذا هو الإحساس الذي تشعر فيه بأن السيارة لا تحافظ على خط مستقيم دون تصحيحات طفيفة مستمرة من السائق. قد تجد نفسك تقوم بضبط عجلة القيادة بشكل دائم على سطح يبدو مسطحًا, طريق مستقيم فقط لإبقاء السيارة متمركزة في حارتها. يحدث هذا التجوال بسبب تآكل المفصل الكروي أو البطانات مما يسمح بزوايا محاذاة العجلة, وخاصة الحدبة واصبع القدم, للتبديل ديناميكيًا أثناء القيادة.
من الأعراض اللمسية الأخرى الاهتزاز الملحوظ في عجلة القيادة, خاصة عند السرعات العالية. في حين أن عدم توازن العجلات هو سبب شائع للاهتزاز, يمكن أن ينتج عن المفصل الكروي السفلي البالي تأثير مماثل. اللعب المفرط في المفصل يمنع العجلة من الدوران بشكل صحيح تمامًا, مما يؤدي إلى اهتزاز يتم إرساله إلى أعلى عمود التوجيه. A more subtle but equally significant symptom is "memory steer." بعد اتخاذ بدوره, من الطبيعي أن ترغب عجلة القيادة في العودة إلى وضعها المركزي. إذا تم تآكل المفصل الكروي السفلي بشكل مفرط أو بدأ في التشنج, يمكن أن يخلق مقاومة تمنع هذا العمل الأناني, إجبار السائق على إعادة توجيه السيارة يدويًا إلى المسار المستقيم. يشير هذا إلى وجود مشكلة ملزمة خطيرة داخل المفصل.
التفتيش البصري: دليل المخبر للبطانات والمفاصل الكروية
غالباً, يمكن إجراء تشخيص نهائي من خلال الفحص البصري الدقيق, بشرط أن تعرف ما الذي تبحث عنه. ويتطلب ذلك رفع مقدمة السيارة بشكل آمن وإزالة العجلة للحصول على رؤية واضحة لمكونات التعليق. ينبغي أن ينصب تركيزك على جلبتي ذراع التحكم — حيث يتصل الذراع بإطار السيارة — والمفصل الكروي السفلي, حيث يتصل الذراع بمفصل التوجيه.
للبطانات, ابحث عن علامات التشقق الشديد, تمزق, أو تدهور في المطاط. في مراحل متقدمة من الفشل, قد ترى أن الغلاف المعدني المركزي قد تحرك بشكل ملحوظ خارج المركز داخل المطاط, أو قد تكون قطع المطاط مفقودة تمامًا. إذا كانت البطانات مملوءة بالسوائل (شائع في العديد من المركبات الحديثة لتحسين التخميد), ابحث عن أي دليل على الظلام, سائل زيتي تسرب إلى الخارج وأدى إلى تلطيخ ذراع التحكم أو الإطار الفرعي.
التالي, حول انتباهك إلى مفصل الكرة. تتم حماية كل وصلة كروية بواسطة حذاء مطاطي مرن يحمل شحوم التشحيم ويمنع الملوثات من الدخول. افحص هذا الحذاء بعناية. إذا كانت ممزقة, ممزق, أو مفقود, المفصل معرض للخطر. سوف يدخل الماء والحصى, غسل الشحوم وتسريع التآكل بسرعة. قد ترى حتى الصدأ أو الشحوم يتسرب من الحذاء التالف. يعد عدم وجود الحذاء علامة قاطعة على وجود مفصل كروي, وبالتالي مجموعة السيارة ذات ذراع التحكم السفلي الأيسر بالكامل (إذا كان المفصل متكاملاً), يتطلب الاستبدال.
| نوع الأعراض | مؤشر محدد | السبب المحتمل (في ذراع التحكم) |
|---|---|---|
| سمعي | خبط حاد أو طرق على المطبات | تآكل المفصل الكروي السفلي أو البطانة الجانبية للإطار |
| ظهرت أو العض أثناء المنعطفات | اللعب المفرط في مقبس مفصل الكرة السفلي | |
| يئن أو يئن تحت وطأتها بسرعات منخفضة | جفاف أو فشل البطانة الأفقية/العمودية | |
| اللمس | اهتزاز عجلة القيادة عند السرعة | مفصل كروي سفلي متهالك وفضفاض |
| Vehicle "wanders" أو يسحب إلى جانب واحد | البطانات الفاشلة تسمح بتغيير المحاذاة | |
| لا يعود التوجيه إلى المركز بسهولة | الاستيلاء على أو ربط المفصل الكروي السفلي | |
| مرئي | ممزق, تسرب, أو الحذاء المطاطي المفقود | فشل مفصل الكرة وشيك أو حدث بالفعل |
| ظهور شقوق أو فجوات في البطانات المطاطية | فشل البطانة, السماح بالحركة المفرطة |
الفحص البدني: استخدام الرافعة المالية للكشف عن اللعب الخفي
أحيانا, فالفحص البصري وحده لا يكفي. يمكن ارتداء الوصلة الكروية أو الجلبة بشكل كبير دون ظهور علامات خارجية واضحة. هذا هو المكان الذي يكون فيه الاختبار الجسدي ضروريًا للكشف عن الرخاوة الخفية. مع دعم وزن السيارة بواسطة حامل رافعة أسفل الإطار (السماح للتعليق بالتعليق بحرية), يمكنك التحقق من اللعب في مفصل الكرة السفلي. أمسك الجزء العلوي والسفلي من الإطار وحاول تحريكه للداخل وللخارج. يجب ألا يكون هناك أي حركة ملحوظة أو صوت خشخشة. أي لعب يشير إلى تآكل في المفصل الكروي.
لاختبار أكثر تحديدا, استخدام شريط نقب طويل. ضع طرف شريط الرفع بين الجزء السفلي من مفصل التوجيه وذراع التحكم السفلي الأيسر, بالقرب من مفصل الكرة. اضغط برفق نحو الأعلى لرفع المفصل قليلًا عن مسمار المفصل الكروي. أثناء تطبيقك وتحرير الضغط, شاهد وتحسس أي حركة رأسية أو خبط في المفصل الكروي. حتى المليمتر الواحد من اللعب العمودي يعد مؤشرًا واضحًا على أن الوصلة الكروية متآكلة بشكل يتجاوز حد الخدمة. يمكنك إجراء اختبار مماثل على البطانات عن طريق وضع شريط الرفع بين ذراع التحكم ونقطة تثبيته على الإطار الفرعي ثم رفعه برفق. أي تحول كبير أو نقاط clunking لفشل البطانة. هذا التأكيد الجسدي يزيل كل الشكوك ويعزز التشخيص.
التفريق بين الجناة: هل هي ذراع التحكم, تلك رود, أو رابط المثبت?
من الأخطاء الشائعة في تشخيص DIY هو إرجاع كل ضجيج الواجهة الأمامية إلى ذراع التحكم. التعليق الأمامي هو النظام, ويمكن للمكونات الأخرى أن تنتج أصواتًا مماثلة عند فشلها. من المهم التمييز.
-
نهاية قضيب التعادل: نهاية قضيب التعادل الخارجي البالية, الذي يربط رف التوجيه بمفصل التوجيه, سوف يسبب عادة أكثر مرونة, صوت قرقعة أقل وضوحًا. The most definitive test is to have a helper rock the steering wheel back and forth slightly while you watch the tie rod end. You will see visible play or hear a clunk as the internal socket moves. A worn tie rod end also more directly impacts the "toe" alignment angle, often causing rapid, feathered wear on the inside or outside edge of the tire.
-
رابط استقرار (ارتباط شريط Sway): The stabilizer link is a smaller rod that connects the end of the stabilizer bar to the suspension, often to the control arm or strut. Its small ball-and-socket joints are a very common source of noise. A worn stabilizer link typically produces a lighter, "من الطراز الأول" أو "clunking" الصوت فوق الصغيرة, المطبات غير المستوية, almost like a handful of loose bolts. Because it primarily deals with body roll, the noise is often more pronounced when one wheel hits a bump independently of the other. You can often diagnose it by grabbing the link firmly and trying to move it; any play in its joints indicates failure.
Understanding these distinctions is paramount. Replacing a perfectly good left lower control arm car part when the true culprit was a simple stabilizer link is a frustrating and costly error. A methodical approach—listen, feel, look, and test—will lead you to the correct source of the problem.
| Component | Primary Function | Common Failure Sound | Key Diagnostic Test |
|---|---|---|---|
| انخفاض ذراع التحكم | Connects frame to knuckle, anchors wheel | عميق "clunk" over bumps, "pop" بالتناوب | Pry bar test for vertical play at ball joint |
| نهاية قضيب التعادل | Connects steering rack to knuckle | Looser clunk when turning steering wheel | Observe play while helper rocks steering wheel |
| رابط استقرار | Connects stabilizer bar to suspension | Lighter "حشرجة الموت" over small bumps | Grasp and shake the link to feel for looseness |
اختيار البديل الصحيح: دليل للمواد, تصميم, والجودة
Once you have definitively diagnosed a faulty left lower control arm, the next phase of the journey begins: selecting a suitable replacement. This is not merely a matter of finding a part that looks similar to the one being removed. The market in 2025 offers a vast array of options, varying in material, تصميم, سمعة العلامة التجارية, and price. The choice you make will have a direct and lasting impact on your vehicle's future performance, أمان, and ride comfort. A well-informed decision is an investment in the vehicle's longevity, while a poor one can lead to premature failure, التعامل مع للخطر, and the frustrating experience of repeating the repair. This selection process requires a thoughtful examination of the differences between original equipment and aftermarket parts, an understanding of the material science behind control arm construction, and an appreciation for the quality of integrated components like bushings and ball joints.
The Philosophical Divide: Original Equipment (OEM) versus Aftermarket Parts
The first major decision point is whether to purchase an Original Equipment Manufacturer (OEM) part or an aftermarket equivalent. An OEM part is identical to the one the vehicle was fitted with at the factory, produced by or for the car manufacturer. An aftermarket part is produced by a different company and is designed to function as a replacement for the OEM part.
OEM parts offer the peace of mind of a guaranteed fit and an assurance of meeting the original performance specifications. The car manufacturer has invested millions in research and development to engineer that specific part for that specific vehicle. As noted in discussions about dealership service, using OEM parts is a key advantage that dealerships highlight, as it ensures compatibility and maintains the vehicle's original engineering intent (tvi-mp3.com). The downside is typically cost; OEM parts are almost always the most expensive option.
أجزاء ما بعد البيع, على الجانب الآخر, exist on a wide spectrum of quality and price. Reputable aftermarket brands, such as those found at a dedicated ذراع التحكم في التعليق المورد, often produce parts that meet or even exceed OEM specifications. These companies may identify a weakness in the original design and improve upon it—for example, by using a more durable bushing material or offering a serviceable (greasable) ball joint instead of a sealed OEM unit. The primary appeal of the aftermarket is the balance of quality and value, offering a reliable repair at a more accessible price point. لكن, the market is also flooded with low-cost, low-quality parts that may be dimensionally inaccurate, use inferior materials, والفشل قبل الأوان. The key is to source parts from a trusted vendor who curates their inventory and stands behind the quality of their products.
A Study in Materials: الصلب المختوم, الحديد الزهر, and Forged Aluminum
The material from which a control arm is made is fundamental to its strength, وزن, والتكلفة. The three most common materials are stamped steel, الحديد الزهر, and forged aluminum.
-
الصلب المختوم: This is the most common and cost-effective construction method. It involves stamping multiple pieces of sheet steel into shape and then welding them together to form the arm. Stamped steel arms offer a good balance of strength and weight for most passenger cars and light SUVs. Their primary vulnerability is rust. If the protective coating is compromised, corrosion can weaken the welds or the steel itself over time, especially in regions that use road salt in winter. When choosing a stamped steel replacement, pay close attention to the quality of the welds and the thickness and durability of the protective E-coating or paint.
-
الحديد الزهر: For heavy-duty applications like trucks and large SUVs, cast iron is often the material of choice. The process involves pouring molten iron into a mold to form a single, solid piece. Cast iron control arms are incredibly strong and durable, capable of withstanding immense loads. Their main drawback is weight. This "unsprung weight" (weight not supported by the springs) can have a minor negative effect on ride quality and handling responsiveness. Cast iron is also more brittle than steel and, while unlikely, can crack under extreme impact.
-
الألومنيوم مزورة: Found on many modern performance and luxury vehicles, forged aluminum arms represent the high-end of the spectrum. Forging involves taking a solid billet of aluminum and shaping it under extreme pressure. This process aligns the grain structure of the metal, resulting in a part that is both incredibly strong and significantly lighter than its steel or iron counterparts. The reduction in unsprung weight enhances suspension responsiveness, leading to improved handling and ride comfort. The main disadvantages of forged aluminum are its high cost and its susceptibility to damage from impact with curbs or large potholes.
Your vehicle was designed with one of these material types in mind. While it is sometimes possible to "upgrade" (على سبيل المثال, from stamped steel to aluminum), it is generally wisest to replace the arm with one made from the same material as the original to maintain the vehicle's designed suspension dynamics.
The Soul of the Arm: Understanding Bushing Composition and Performance
The control arm itself is a simple lever, but its bushings are the silent, compliant heart of the assembly. These rubber or polyurethane cylinders isolate the cabin from road noise and vibration while precisely controlling the movement of the arm. The quality of the bushings in a replacement left lower control arm car part is just as important as the arm itself.
-
البطانات المطاطية: The vast majority of OEM and standard aftermarket control arms use rubber bushings. Modern automotive rubber is a sophisticated synthetic compound designed for a specific balance of durability, المرونة, and vibration damping. Some advanced designs are "hydro-bushings," which are fluid-filled to provide superior damping characteristics across a range of frequencies. The main advantage of rubber is its ability to absorb noise and harshness, providing a comfortable ride. Its weakness is susceptibility to age, حرارة, and oil contamination, which can cause it to dry out, كسر, and fail.
-
البطانات البولي يوريثين: For drivers seeking enhanced performance and durability, البولي يوريثين (often called "poly") bushings are a popular upgrade. Polyurethane is a much firmer material than rubber and is highly resistant to oil, chemicals, and degradation. This firmness results in more precise and responsive handling, as there is less deflection in the suspension geometry under cornering loads. The trade-off is a noticeable increase in the transmission of noise, اهتزاز, والقسوة (NVH) في المقصورة. A car with full polyurethane suspension can feel much more connected to the road, but it will also be a louder and rougher ride. For a daily-driven vehicle, high-quality rubber bushings often provide the best overall balance.
The Integrated Ball Joint: A Point of Articulation and a Common Failure Point
In most modern front suspension designs, the lower ball joint is integrated into the control arm. It is not a separately replaceable part. This means that when the ball joint fails, the entire control arm assembly must be replaced. The quality of this integrated ball joint is therefore a paramount consideration when selecting a replacement part.
A high-quality ball joint will feature a hardened, highly polished ball stud and a durable, low-friction polymer bearing (like Delrin). This ensures smooth articulation and a long service life. Cheaper units may use softer metal and lower-grade plastic bearings that wear out quickly, leading to the return of the clunking noises you just worked to eliminate. Some premium aftermarket control arms feature an improved ball joint design, such as a "greasable" or serviceable joint. These have a Zerk fitting that allows you to periodically inject fresh grease, flushing out contaminants and extending the joint's life significantly. This is a valuable feature, especially for vehicles operated in harsh conditions. When examining a potential replacement, look for a robust ball joint boot made from high-quality neoprene or silicone, as this is the first line of defense against contamination.
Navigating the Market: How to Verify Fitment for Your Specific Vehicle in 2025
Vehicle manufacturers often make mid-year changes to suspension components. أ 2025 model built in January may have a different control arm than one built in July. Using the Vehicle Identification Number (رقم VIN) is the most reliable way to ensure you are purchasing the correct part. Reputable online suppliers provide tools to verify fitment using your VIN or by selecting your vehicle's precise year, يصنع, نموذج, and sub-model. A company that has been in the business for a long time, as detailed on their about us page, will likely have the robust cataloging systems needed for this accuracy. Double-check details like the material (steel vs. الألومنيوم) and the design of the ball joint taper. Rushing this step can lead to receiving a part that simply will not fit, causing significant delays and frustration.
المرحلة التحضيرية: تمهيد الطريق لإصلاح ناجح
Approaching a significant automotive repair like replacing a left lower control arm car component is much like preparing for a surgical procedure. The success of the operation is determined not only by the skill applied during the main event but also by the meticulous preparation that precedes it. A well-prepared workspace, the correct assortment of tools, and a strict adherence to safety protocols are not preliminary formalities; they are integral parts of the job itself. Rushing this phase is a common mistake that can lead to stripped bolts, damaged components, personal injury, and a simple job turning into a multi-day ordeal. By dedicating time and attention to preparation, you create an environment of safety, efficiency, and control, setting the stage for a smooth and successful replacement.
The Sanctity of Safety: Essential Precautions Before You Begin
There is no component or repair worth compromising your personal safety. The forces involved in a vehicle's suspension are immense, and the vehicle's weight is lethal if not properly managed. The single most important rule is to never work under a vehicle supported only by a jack. Jacks are for lifting, not for supporting.
- Stable Ground: Begin by parking the vehicle on a hard, سطح مستو مثل أرضية المرآب الخرسانية أو الممر. Never attempt this work on soft ground like grass, الأوساخ, or asphalt on a hot day, as the jack stands can sink.
- تأمين السيارة: Engage the parking brake firmly and place wheel chocks behind the rear wheels to prevent the vehicle from rolling.
- Proper Lifting: Consult your owner's manual to identify the correct factory lift points on the vehicle's frame. قد يؤدي استخدام النقطة الخاطئة إلى إتلاف السيارة أو إنشاء مصعد غير مستقر. Use a quality hydraulic floor jack to raise the front of the vehicle.
- Use Jack Stands: Once the vehicle is raised to a sufficient height to allow the front wheel to be removed and provide working space, place a pair of appropriately rated jack stands under the designated support points on the frame or subframe. قم بخفض السيارة ببطء حتى يستقر وزنها بالكامل على حوامل الرافعة. Give the vehicle a firm shove to ensure it is stable and will not shift. The jack can be left in place as a backup, but it should not be bearing the load.
- Personal Protective Equipment (PPE): Always wear safety glasses or goggles. Springs can be under tension, rust can flake off into your eyes, and tools can slip. A good pair of mechanic's gloves will protect your hands from cuts, الخدوش, and grime.
Assembling Your Arsenal: The Comprehensive Tool and Equipment List
Walking back and forth to your toolbox for a forgotten socket is inefficient and breaks your concentration. Before you even loosen the first bolt, assemble every tool you will need. While the exact sizes will vary by vehicle, a typical lower control arm replacement requires a fairly standard set of tools.
Basic Hand Tools:
- A comprehensive socket set in both metric and standard sizes (اعتمادا على سيارتك), with 3/8-inch and 1/2-inch drive ratchets. You will likely need deep and shallow sockets.
- A set of combination wrenches.
- A breaker bar (1/2-inch drive is standard) for loosening stubborn, high-torque bolts.
- A reliable torque wrench. This is not an optional tool. Control arm bolts are safety-critical and must be tightened to the manufacturer's precise specification. Both click-type and beam-type wrenches are acceptable, but they must be accurate.
Specialty Tools:
- فاصل الكرة المشتركة: This is perhaps the most important specialty tool. The tapered stud of the ball joint becomes wedged very tightly into the steering knuckle. Simply hammering on it is a bad idea, as it can damage the knuckle or other components. Several types of separators are available:
- Pickle Fork: بسيطة, wedge-shaped tool that is driven between the knuckle and control arm. It is effective but almost always destroys the ball joint's rubber boot, making it suitable only when you are replacing the arm anyway.
- Scissor or Clamp-Style Separator: A more controlled tool that uses a bolt to apply steady pressure and "press" the ball joint stud out of the knuckle without impact. This is the preferred method.
- Large Pry Bars: Essential for nudging the suspension into place and for testing for play during diagnosis.
- A Heavy Hammer or Mallet: أحيانا, a sharp, authoritative strike on the side of the steering knuckle (right where the ball joint stud passes through) is enough to shock the tapered connection loose. Never strike the stud itself.
The Power of Penetrating Oil: Winning the Battle Against Rust and Corrosion
The underside of a vehicle is a harsh environment. Bolts are exposed to water, ملح, and grime, leading to significant rust and corrosion. Attempting to remove a 15-year-old control arm bolt with brute force alone is a recipe for a sheared bolt head, which turns a two-hour job into a weekend-long nightmare of drilling and tapping.
Your secret weapon is penetrating oil. At least a few hours—or even better, the day before—generously spray every nut and bolt you intend to remove. This includes the main control arm mounting bolts, the ball joint nut, and the stabilizer link connections. The oil will slowly wick its way into the threads, breaking down rust and easing removal. Reapply it just before you begin work. This single, simple step can be the difference between a smooth disassembly and a major setback. For particularly stubborn bolts, a small amount of heat from a propane torch can also help by causing the metal to expand, but this should be done with extreme caution, keeping the flame away from rubber bushings, خطوط الوقود, and the ball joint boot.
Staging the Operation: Preparing the Vehicle and Organizing Your Parts
With the vehicle safely supported and your tools at the ready, the final preparatory step is to stage the workspace. Remove the front wheel and set it aside. This is also a good time to turn the steering wheel to one side or the other to improve access to the control arm bolts or the ball joint nut. على سبيل المثال, to work on the left lower control arm, turning the steering wheel all the way to the right may expose the rear of the knuckle.
Unbox your new left lower control arm car part. Compare it directly to the one on the vehicle. Are the mounting points in the same location? Is the ball joint stud the same taper and length? Does it have the same provisions for attaching the stabilizer link or other brackets? Verifying this now prevents you from completing half the disassembly only to discover you have the wrong part. Keep all new hardware, like cotter pins or nuts that came with the new arm, organized in a magnetic tray or container so they don't get lost. A little organization at the beginning pays huge dividends in efficiency and reduced stress during the core of the work. This commitment to quality and process is often a hallmark of a company that is proud of its history and expertise.
الإجراء الجراحي: دليل منهجي لاستبدال ذراع التحكم السفلي الأيسر
With the vehicle secure, the tools laid out, and the new part verified, the time has come to perform the replacement. This process demands a sequence of deliberate actions. Each bolt removed and each connection separated is a step that must be done with an understanding of its function and the potential pitfalls. Think of yourself not as a brute-force mechanic, but as a surgeon making precise incisions to remove a faulty component while preserving the health of the surrounding system. The goal is a clean extraction and a perfect installation, ensuring the new arm integrates seamlessly into the complex anatomy of the suspension. A patient, step-by-step approach is the surest path to success.
The Initial Disassembly: Gaining Access to the Arm
The first steps involve clearing a path to the left lower control arm itself. While not always strictly necessary, removing the brake caliper and rotor can provide significantly more working room and prevent accidental damage to the brake hose.
- Remove the Brake Caliper: Locate the two caliper mounting bolts on the back of the steering knuckle. Loosen and remove them. Do not allow the caliper to hang by its brake hose, as this can cause internal damage. Use a caliper hanger or a piece of wire to suspend it from the coil spring or another sturdy point.
- Remove the Caliper Bracket and Rotor: If the caliper bracket is separate, remove its mounting bolts and set it aside with the caliper. The brake rotor should now slide off the wheel hub. If it is stuck due to rust, a few solid taps with a mallet on the hub-facing side can help break it loose.
This initial clearing of components gives you an unobstructed view and much better access to the core connections you need to address next: رابط الاستقرار, the outer tie rod end, and the all-important lower ball joint.
Freeing the Connections: Disconnecting the Stabilizer Link and Tie Rod End
The control arm is part of an interconnected system. To remove it, you must first detach the other components that are attached to it or are in the way.
-
رابط استقرار: The stabilizer link is often connected directly to the control arm. It will typically have a nut on both the top and bottom. You will likely need to use a wrench on the nut and an Allen key or another wrench on the stud itself to keep it from spinning. Remove the nut connecting the link to the control arm. If you are only disconnecting the bottom, you may be able to swing the link up and out of the way. Given their low cost and high failure rate, it's often wise to replace the stabilizer links at the same time as the control arms.
-
Outer Tie Rod End: While you don't need to remove the tie rod end from the tie rod, you do need to separate it from the steering knuckle to allow the knuckle to move freely. Loosen the nut on the tie rod end's stud but do not remove it completely. Leave it on by a few threads. الآن, give the side of the steering knuckle a few sharp, powerful blows with a heavy hammer. This shock will often pop the tapered stud free. The nut you left on will prevent the tie rod from falling away violently. Once it's loose, you can remove the nut and separate the tie rod end from the knuckle.
The Art of Separation: Releasing the Lower Ball Joint from the Steering Knuckle
This is often the most challenging step of the entire process. The tapered steel stud of the ball joint is pressed into a matching tapered hole in the steering knuckle, creating an incredibly strong friction fit.
- Remove the Nut: أولاً, remove the large castellated nut or nylon lock nut from the bottom of the ball joint stud. If there is a cotter pin, remove it first.
- Apply a Separator: Use your chosen ball joint separator. If using a scissor-style press, position it with one jaw on the top of the control arm (or the knuckle) and the forcing screw on the bottom of the ball joint stud. Tighten the screw until the separator is under significant tension.
- Add Shock: If tightening the separator alone doesn't pop the joint loose, leave the tension on the tool and strike the side of the steering knuckle forcefully with your hammer as you did for the tie rod end. The combination of steady pressure from the separator and the sharp shock from the hammer is almost always effective. It will release with a loud "BANG."
- ال "Pickle Fork" طريقة: If you are using a pickle fork, drive it between the control arm and the knuckle. This will force them apart but will tear the ball joint boot. Since you are replacing the entire left lower control arm car assembly, this damage is irrelevant.
Once the ball joint is free from the knuckle, the entire knuckle/hub/strut assembly can be pushed aside, giving you clear access to the final mounting bolts.
Unbolting the Core: Removing the Control Arm from the Vehicle's Frame
The left lower control arm is typically held to the vehicle's subframe or unibody frame by two large bolts, one passing through a horizontal bushing at the front and another through a vertical bushing at the rear. These bolts are installed with very high torque and are often seized by rust.
- Apply Force: Using your long breaker bar and the correct size socket, carefully break these bolts loose. Ensure the socket is fully seated on the bolt head to avoid rounding it off. You may need to use a piece of pipe on the end of the breaker bar for extra leverage.
- Mind the Alignment Cams: Pay close attention to the mounting bolts. On many vehicles, these bolts use eccentric cams or washers that are used to set the vehicle's wheel alignment (specifically camber and caster). It is a good practice to mark the position of these cams relative to the frame before you loosen them. Use a paint marker or a scribe to make a clear witness mark. This will allow you to get the alignment "close enough" upon reassembly to safely drive the car to an alignment shop.
- Remove the Arm: Once the bolts are removed, the old control arm should be free. It may require some wiggling and prying to extract it from its mounting brackets, but it should come out without too much difficulty.
The Installation Dance: Positioning and Fastening the New Left Lower Control Arm
Installation is, for the most part, the reverse of removal, but with a few critical considerations.
- Position the New Arm: Maneuver the new control arm into its mounting brackets on the subframe.
- Install Frame Bolts Loosely: Insert the two main frame bolts. If your vehicle uses alignment cams, try to line them up with the marks you made earlier. Thread the nuts on but leave them loose enough that the control arm can still pivot up and down freely. This is the single most important detail of the installation process.
- Connect the Ball Joint: Swing the steering knuckle back into position and guide the new ball joint stud up through the hole in the bottom of the knuckle. Install the new nut provided with the arm and tighten it to the manufacturer's specified torque. If it's a castellated nut, tighten it to the minimum torque, then continue tightening only as much as needed to align the slot in the nut with the hole in the stud for the new cotter pin. Install the new cotter pin and bend the tabs to secure it.
- Reconnect Other Components: Reattach the outer tie rod end to the knuckle and torque its nut. Reconnect the stabilizer link to the new control arm and tighten its fastening nut.
The Principle of Preloading: Why You Must Torque Bushings at Ride Height
You must not tighten the main control arm bushing bolts while the suspension is hanging in the air. The rubber bushings are designed to sit in a neutral position when the car is on the ground at its normal ride height. If you tighten the bolts with the suspension fully extended, the rubber bushings will be in a constant state of pre-loaded twist once the car is on the ground. This will cause them to fail in a matter of weeks or months, leading to a return of your original problems.
To do this correctly, you must "load" the suspension before the final torque is applied.
- Support the Arm: Place your floor jack under the new left lower control arm, بالقرب من مفصل الكرة.
- Simulate Ride Height: Slowly raise the jack, compressing the suspension until the vehicle just begins to lift off the jack stand. This approximates the normal ride height position.
- Apply Final Torque: With the suspension compressed and the bushings in their neutral state, now you can use your torque wrench to tighten the two main control arm frame bolts to the exact specification listed in your vehicle's service manual.
Once the final torque is applied, you can lower the jack, reinstall the brake rotor and caliper (torquing the caliper bolts correctly), and mount the wheel.
بروتوكول ما بعد التثبيت: ضمان طول العمر والأداء
The physical act of replacing the left lower control arm car part is complete, but the job is not yet finished. The final phase of the process involves a series of verification steps and follow-up actions that are essential for validating the repair, ensuring the safety of the vehicle, and maximizing the lifespan of the new component. Skipping these post-installation rituals is like a surgeon sending a patient home without scheduling a follow-up appointment; it leaves the long-term success of the procedure to chance. These steps, particularly the wheel alignment, are not optional recommendations but fundamental requirements for restoring the vehicle's designed handling characteristics and safety.
The Absolute Necessity of Wheel Alignment
This is the most critical post-replacement step and it is non-negotiable. Replacing a lower control arm fundamentally alters the vehicle's suspension geometry. Even if you meticulously marked the position of the alignment cams, you have only achieved a rough approximation of the correct settings. The three primary alignment angles—camber, المذرة, and toe—are all affected.
- احدودب: This is the inward or outward tilt of the top of the tire when viewed from the front. The lower control arm is the primary determinant of the camber angle. An incorrect camber angle will cause the tire to wear unevenly on its inner or outer shoulder.
- المذرة: This is the forward or rearward tilt of the steering axis. Caster affects steering stability and the steering wheel's ability to self-center after a turn. The fore-aft position of the lower control arm directly influences caster.
- اصبع القدم: This is the direction the tires are pointing relative to each other, like looking down at your own feet. While the tie rods are the primary adjustment for toe, changing the control arm's position (which affects camber and caster) will have a secondary effect on the toe setting.
Driving a vehicle with improper alignment is not only unsafe, leading to unpredictable handling and pulling, but it will also rapidly destroy your tires. A brand-new set of tires can be ruined in just a few thousand miles. You must take the vehicle to a qualified shop with a modern laser alignment rack to have a professional four-wheel alignment performed. Think of the cost of the alignment not as an extra expense, but as the final, required cost of the control arm replacement itself. It protects your investment in the new parts and your tires.
The Post-Operative Test Drive: Listening and Feeling for Success
After the alignment is complete, perform a thorough test drive. This is your opportunity to confirm that the original problem has been resolved and that no new issues have been introduced.
- Find a Safe Environment: Choose a quiet road or an empty parking lot where you can focus on the vehicle's behavior without the distraction of heavy traffic.
- Listen Carefully: Drive over the same types of bumps and make the same types of turns that previously produced the clunking or popping noises. The front end should now be silent, with only the muted, solid sound of a healthy suspension at work. Listen for any new squeaks, groans, or rattles that might indicate a loose bolt or a component that is rubbing.
- Feel the Steering: Pay close attention to the steering wheel. It should feel tight and responsive. ال "wander" should be gone, and the car should track straight and true. After making a 90-degree turn, the steering wheel should smoothly and consistently return to the center on its own.
- Test the Brakes: Apply the brakes moderately at various speeds to ensure the brake caliper and rotor were reinstalled correctly and are functioning normally. There should be no pulsations or noises from the brakes.
This test drive is your final quality control check. It provides the sensory confirmation that the mechanical work has translated into a tangible improvement in the vehicle's performance and comfort.
A Final Check: Retorquing Fasteners After a Break-In Period
While modern fasteners and torque procedures are very reliable, it is a professional best practice to re-check the torque on critical fasteners after a short break-in period. After driving for approximately 50 ل 100 أميال (أو 80 ل 160 كيلومترات), find a safe opportunity to raise the vehicle again and put a torque wrench on the key bolts you replaced.
Focus on the two main control arm-to-frame bolts and the lower ball joint nut. Do not loosen them; simply set your torque wrench to the specified value and verify that the bolt does not turn before the wrench clicks. This check ensures that nothing has settled or shifted in a way that would reduce the clamping force of the bolts. It is a quick step that provides an extra layer of confidence and safety, confirming that the repair will remain secure for the long term. This level of thoroughness is what separates a simple parts-swapper from a true technician, a sentiment echoed by experts who emphasize that comprehensive documentation and follow-up are key to customer confidence and retention (tvi-mp3.com).
Understanding the Broader System: How One Replacement Affects Other Components
Replacing the left lower control arm does not happen in a vacuum. It's an opportunity to consider the health of the entire suspension system. The new, tight control arm will now transfer forces differently than the old, worn one. This can sometimes expose a weakness in another, older component. على سبيل المثال, a worn strut or a failing control arm on the opposite side of the vehicle may become more noticeable now that one side is new and firm.
During the repair, you should have taken the opportunity to inspect the other nearby parts. How did the outer tie rod end feel? Was the stabilizer link tight? Did you notice any cracking on the axle boot or leaking from the strut? Addressing these issues proactively, or at least being aware of them, is part of a holistic approach to vehicle maintenance. Consistent evaluation and timely replacement of related accessories like belts and hoses are known to reduce the likelihood of more costly future repairs (freewayford.net). By viewing the replacement of the left lower control arm car part as one part of maintaining a complex system, you move from a reactive to a proactive mindset, ensuring the continued safety and reliability of your vehicle for years to come. This approach is fundamental to the philosophy of a reliable auto parts supplier like قطع غيار السيارات إلى الأمام, which seeks to empower customers with knowledge, not just sell them components.
الأسئلة المتداولة (التعليمات)
What is the primary function of a left lower control arm in a car? The left lower control arm is a critical suspension component that connects the vehicle's frame to the steering knuckle, which holds the wheel. It acts as a pivot point, allowing the wheel to move up and down with the road surface while maintaining the vehicle's alignment and stability.
How long can I expect a replacement lower control arm to last? The lifespan of a replacement control arm depends heavily on its quality, the driving conditions, and the vehicle. A high-quality OEM or premium aftermarket control arm can last 80,000 ل 100,000 أميال أو أكثر. Lower-quality parts may fail in as little as 20,000 أميال. Driving on poorly maintained roads with many potholes will shorten its life.
Is it safe to drive my car with a bad lower control arm? Driving with a severely worn lower control arm is not recommended and can be dangerous. A worn ball joint or bushings can cause loss of steering control, unpredictable handling, and excessive tire wear. In a worst-case scenario, a complete failure of the ball joint can cause the wheel to separate from the suspension, مما يؤدي إلى فقدان السيطرة بشكل كامل.
هل يجب أن أستبدل أذرع التحكم اليسرى واليمنى في نفس الوقت? While not always strictly necessary, يوصى به بشدة. Suspension components on both sides of a vehicle experience similar wear over time. If the left lower control arm has failed due to age or mileage, the right one is likely not far behind. Replacing them in pairs ensures balanced handling and saves you from having to perform the same job twice in the near future.
What is the average cost to replace a left lower control arm? اعتبارا من 2025, the cost can vary significantly. The part itself can range from under one hundred dollars for a basic aftermarket arm to several hundred dollars for an OEM or high-performance aluminum arm. Professional labor can add another two to four hundred dollars, depending on the vehicle's complexity and local labor rates. A professional wheel alignment, which is mandatory after the repair, will add to the total cost.
What is the difference between a control arm and a tie rod? A control arm manages the vertical movement of the wheel and anchors its position relative to the car's body. A tie rod is part of the steering system; it connects the steering rack to the wheel's knuckle and is responsible for turning the wheel left and right when you move the steering wheel.
Can I perform a wheel alignment myself after replacing the control arm? لا, a proper wheel alignment requires specialized, expensive laser-guided equipment to accurately measure and adjust the camber, المذرة, and toe angles to within fractions of a degree. It is a job that must be performed by a professional alignment technician.
خاتمة
The left lower control arm, though hidden from view, functions as a linchpin of your vehicle's stability and directional control. Its health is directly tied to your safety and the quality of your driving experience. The journey from identifying a subtle clunk to feeling the solid, responsive handling after a successful repair is an empowering one. It transforms the driver from a passive operator into an engaged and knowledgeable custodian of their machine. This process requires more than just mechanical aptitude; it demands a methodical diagnostic process, an informed selection of quality components, and a disciplined, safety-conscious approach to the replacement procedure itself. The final, crucial step of a professional wheel alignment is not an afterthought but the act that solidifies the repair, ensuring that the new mechanical integrity translates into precise, predictable performance on the road. By embracing this comprehensive understanding, you not only restore a single part but reaffirm the safety and reliability of the entire vehicle.
مراجع
FasterCapital. (2024). Assessing outbound logistics and value chain enhancement. FasterCapital. https://fastercapital.com/topics/assessing-outbound-logistics-and-value-chain-enhancement.html
الطريق السريع فورد. (2025). نظرة عامة على خدمة سيارات فورد. الطريق السريع فورد. https://www.freewayford.net/what-is-an-auto-service.html
جيليسبي, ت. د. (1992). أساسيات ديناميكيات المركبات. جمعية مهندسي السيارات.
Global Auto Parts. (2025). FAQs. Global Auto Parts. https://www.globalautoparts.biz/faqs/
TVI MarketPro3. (2024a). Dealership profits with mobile service solutions. TVI MarketPro3. https://www.tvi-mp3.com/blog/insights/dealership-profits-with-mobile-service-solutions/
TVI MarketPro3. (2024b). Sales funnels for dealership service departments. TVI MarketPro3. https://www.tvi-mp3.com/blog/insights/sales-funnels-for-dealership-service-departments/
TVI MarketPro3. (2025a). Strategies for service drive success in 2025. TVI MarketPro3. https://www.tvi-mp3.com/blog/strategies-for-service-drive-success-in-2025/
TVI MarketPro3. (2025b). Technicians’ impact on dealership retention: The secret to long-term success. TVI MarketPro3. https://www.tvi-mp3.com/blog/insights/technicians-impact-on-dealership-retention/